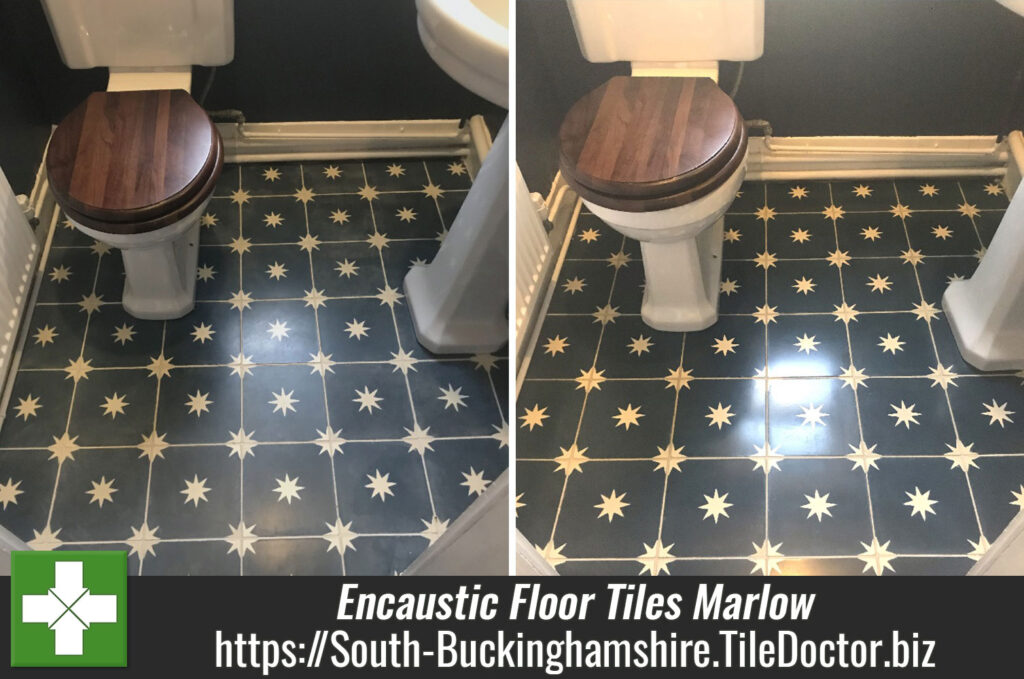
Modern Encaustic Floor Tiles Renovated in Marlow
The pictures below were taken at a property in the old town of Marlow which had modern Encaustic tiles installed in the downstairs WC. Although they may appear on first appearance to be perfectly fine the owner had called us in to deal with the staining around sink area around toilet.
The tiles had only been installed six months earlier and after surveying the floor it was clear to me that the tiler hadn’t applied enough protective sealant following installation. I quoted for deep cleaning the floor with diamond burnishing pads and then re-sealing with a stronger sealer which given the small size of the floor should be completed in a day.

Deep Cleaning an Encaustic Tiled WC Floor
To remove the original sealer and deep clean the encaustic tiles I started with a 200-grit burnishing pad lubricated with water. The floor was too small for a buffer machine so I used 6-inch pads fitted to a hand buffer. This action cuts back the tiles removing the stains in the process.
After rinsing and extracting the soiling that was generated, I checked the floor to confirm the staining was gone. I could see that the 200-grit pad had done the job and there was no need to apply a coarser 100-grit so I followed up with finer 400 and 800 grit pads. Again, water was used to lubricate the process and the floor was rinsed and extracted after each pad. I went over the floor slowly to ensure each tile had a deep clean and to avoid creating any swirl marks.
Once the 400 & 800 grit pads had been applied, I buffed the tiles with a White rag to remove any excess water and get it ready for the next pad which would enhance the deep blue colours in the floor. Once the floor was dry a very fine 1500-grit pad was applied to compete the burnishing and add a slight shine to the tiles, this also leaves the floor nice and dry and ready for sealing.

Sealing an Encaustic Tiled WC Floor
To seal the floor, I used an oil-based sealer called Tile Doctor X-Tra Seal, which is rated for internal and external use. I allowed it to soak into the encaustic tiles which would allow the colours to really darken after the use of the burnishing pads.
After about thirty minutes I rubbed off the excess with a White cloth and then proceeded to apply a 3000-grit buffing pad to leave a smooth surface and an even shine all over the floor. I finished off with a further coat of X-Tra Seal and left for 30 minutes and repeated the same process giving a deep colour finish and leaving the floor well protected.
The customer where very happy with the result and recommended us to friends of theirs who had the same tiled floor. Before leaving I spent a few minutes to discuss aftercare cleaning, which for this floor I recommend Neutral Tile Cleaner.
Professional Renovation of Stained Encaustic Tiles in Buckinghamshire
Modern Encaustic Floor Tiles Renovated in Marlow Read More »