Acid-Gel

Listed Terracotta Floor Renovation High Wycombe

Renovation of an 18th Century Listed Terracotta Floor in High Wycombe

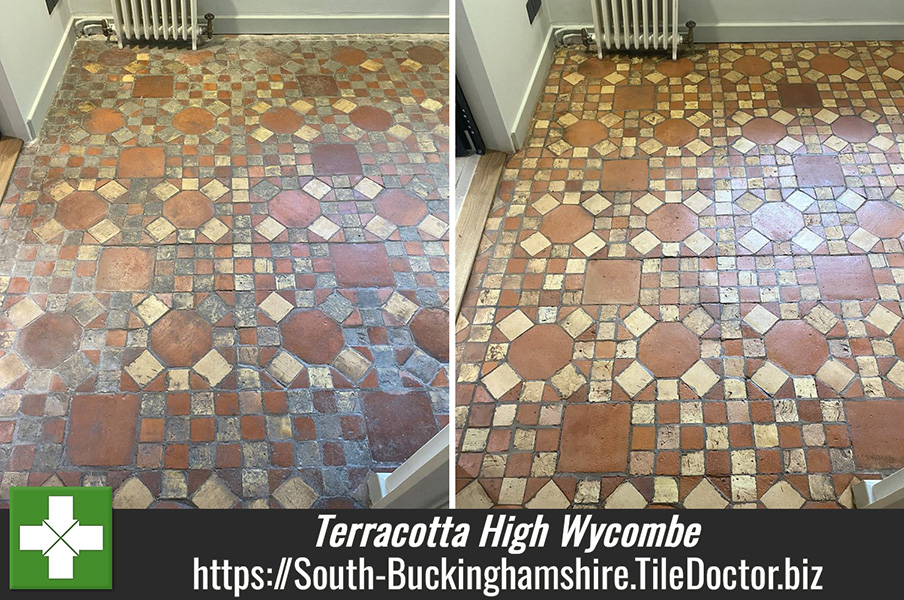
We were contacted by the owner of an 18th century barn in High Wycombe about a mosaic Terracotta tiled floor that needed renovating. The barn had been converted into a modern house but the customer had to keep the floor as parm of the planning constraints due to the property being listed. With most of the renovation work now completed the floor had become heavily stained and the owner was looking to have the floor sympathetically cleaned.

Listed Terracotta Floor Before Cleaning High Wycombe

Having popped over to the property to take a detailed look at the Terracotta tiles, make sure it was structurally sound and work out a detailed quotation that would include a complete strip, deep clean and reseal. The job would take two days, one day to clean allow drying time and then one day to seal.

Listed Terracotta Floor Before Cleaning High Wycombe

The quote was accepted and date set for the work to start; the floor was solid so no repairs would be needed and no tiles to order beforehand.

Deep Cleaning Terracotta Kitchen Tiles

On day one work started by covering the tiles with Tile Doctor Oxy-Gel and allowing it to dwell for twenty minutes or so. This product is a strong alkaline gel cleaner that’s ideal for cleaning old floors that don’t have a damp proof membrane, liquid cleaners use more water and would require longer drying times. The long dwell times allow the product longer to break down the soils in the tile which on this floor was quite heavy.

Next the floor was scrubbed using a Rocky floor machine fitted with a 60-grit carbide brush, these brushes are very good at getting into the crevices of the tiles and take the heavy lifting out of cleaning. Working in small sections I scrubbed the floor with extra weight added to the buffer for maximum traction and a deeper clean.

The soiling was then extracted using a wet vacuum to reveal a real transformation and an impressive difference in the colour of the tiles. The floor was checked and any issues spot cleaned, for instance I noticed a few of the yellow terracotta tiles where darker than the rest so I used Tile Doctor Remove and Go to clean them further and I was pleased to see it made a significant improvement. Just goes to show how resilient tiled floors can be, regardless of age.

Next the floor was given an acid rinse to neutralise the ph. level after the use of alkaline cleaning products and to further clean the tiles and remove any residue marks. To do this another Tile Doctor gel cleaning product was applied called Acid Gel and then rinsed off with water and extracted with the wet vacuum. The floor was also mopped with Tile Doctor Neutral Tile Cleaner to ensure it was clear of all cleaning products, then after another extraction with the wet vacuum left to dry overnight.

Sealing a Terracotta Tiled Kitchen Floor

The next day I arrived and started work by checking if the floor was dry enough for sealing. I used a digital damp meter for this and I was pleased to see the use of gel cleaning products had helped keep moisture to a minimum.

Happy with the moisture readings the first of what would be seven coats of sealer was applied to the floor; Terracotta is very porous so does require a lot of sealer to get the right level of protection. It’s important to use a breathable sealer on an old floor like this so Tile Doctor Seal and Go Extra was chosen which is an acrylic-based seal that adds a nice subtle sheen to Terracotta tiles.

Listed Terracotta Floor After Renovation High Wycombe

The sealer is applied using a cotton cloth and wiped over with a white rag building up the layers and leaving a good amount of time in between to dry. The sealer will sit on top of the floor improving its appearance and making it smoother and easier to clean going forward.

Listed Terracotta Floor After Renovation High Wycombe

Once complete the clean tiles and new sealer really brought out the colours in the floor bringing it to life making it quite the period feature in what is now a modern home. Most of the tiles responded well to the cleaning but given its age there were some that I couldn’t get perfect however I think this adds character to an old floor and considering its age it came out well.

For aftercare I left the customer with remainder of the sealer so it can topped up and recommended Tile Doctor Neutral Cleaner for regular cleaning.


Professional Cleaning of a Period Terracotta Tiled Floor in South Buckinghamshire

Renovation of an 18th Century Listed Terracotta Floor in High Wycombe Read More »

Black Limestone Patio Renovation Gerrards Cross

Dull Black Limestone Patio Renovated in Gerrards Cross

This customer from Gerrards Cross contacted me about their Black Limestone patio which had not been laid that long ago but was already in need of attention. Having spoken to the owner on the phone I arranged to visit the property so I could assess the issues in full and prepare a quote.

Black Limestone Patio Before Renovation Gerrards Cross

I visited the property to survey the patio and could immediately see that the Black Limestone flags looked washed out and grey, nothing like the beautiful dark stone he was expecting. It was clear that the installers hadn’t done anything to the stone after laying the patio, excess grout (grout haze) needed removing and no protective sealer had been applied resulting in staining from plant pots and spillages.

I recommended a restorative treatment involving deep cleaning, removing the grout smears, oiling to restore texture and the application of a colour enhancing sealer. This process would restore its original appearance and get the patio looking as it should.

Black Limestone Patio Before Renovation Gerrards Cross

Happy to hear the situation could be resolved my quote was accepted and a date scheduled for the work to begin.

Cleaning and Restoring a Black Limestone Tiled Patio

I arrived on the first day and started by helping the customer move furniture off the patio so I had a clear work area. Then work started off by scrubbing the stone with a Rocky floor machine fitted with a silicon carbide brush. This action gets into the stone giving them a deep clean, with the brush I also applied Tile Doctor Pro-Clean which is a strong alkaline cleaner and left that down for fifteen minutes to soak in first. With the dirt released from the stone onto the surface a wet vacuum is used to hoover up the resultant slurry.

Once cleaned the patio was inspected and I could see there was still evidence of grout haze on the Limestone so I used a 400-grit burnishing pad with water to take if off and then left the patio to dry out overnight ready for sealing. This work as actually carried out in the summer of 2022 so the weather wasn’t a problem.

Sealing a Limestone Tiled Patio

On the second day work started by checking the moisture readings of the Limestone tiles using a damp meter. The readings were within tolerance so I was able to apply an initial coat of Tile Doctor Colour Grow sealer which is a colour enhancing impregnator that soaks into the pores of the stone. A very thick first coat was applied and allowed to soak in which it did very quickly.

This was then followed by a thick coat of Tile Doctor Stone Oil and allowed to soak in for roughly an hour before buffing it with a cloth to collect any excess residue. The Stone Oil gave the tiles a very deep black colour which seeped into the stone and this is exactly the appearance my customer wanted. It was quite the transformation from the dull washed-out looking patio that was here before.

Black Limestone Patio After Renovation Gerrards Cross

Finally, I applied a third and final coat of Tile Doctor Ultra-Seal resulting in a resilient sandwich of coatings that should keep the stones appearance for some time to come. This last coat was applied using a microfibre cloth allowing it to seep into the stone. Once I felt the Black Limestone had dried sufficiently, I used a white buffing pad to buff over the patio and remove any residue.

The customer was very happy with his new patio and recommended me to a neighbour who had a similar problem with their patio.

Black Limestone Patio After Renovation Gerrards Cross


Professional Restoration of a Black Limestone Patio in Buckinghamshire

Dull Black Limestone Patio Renovated in Gerrards Cross Read More »

Victorian Porch Tiles Renovated in Chesham

Cracked Victorian Hallway and Porch floor tiles Restored in Chesham

This client from Chesham got in touch due to cracked and chipped Victorian tiles in their hallway. The Victorian floor tiles in both the hall and the outside porch were over 150 years old and many of them needed replacing and relaying, they also wanted the floor to be cleaned and sealed.

Victorian Tiled Porch Floor Before Restoration Chesham

They were keen to spruce up the entrance area to the property and ensure it retained its original appearance in keeping with the age of the property. I visited site to check what needed to be done and gave them a quote for the work which they were happy to accept.

Repairing a Victorian Tiled Hallway and Porch Floor

Arriving on day one of a four-day job I marked out which tiles would need replacing as the client wanted to only do this kind of job once so any tiles with a chip or crack in had to be replaced. Fortunately, we were able to source a good range of reclamation and reproduction tiles so finding replacements to match is not too difficult. In total 90 tiles need replacing and work began by cutting out the grout lines around the broken tiles then drilling through the middle to stop any other tiles breaking around it and carefully removing them.

Victorian Tiled Hallway Floor During Restoration Chesham

We were able to remove all the damaged tiles on day one so the morning of day two began with measuring, cutting, and placing in the replacement tiles to be fixed in later that day using a flexible Mapie adhesive. With the repairs out of the way and the replacements now firmly fixed in place we would be able to start the cleaning on day three.

Deep Cleaning a Victorian Tiled Hallway and Porch Floor

To deep clean the Victorian tiles a high alkaline cleaner called Tile Doctor Pro-Clean was sprayed onto the floor, left to soak in for ten minutes and then scrubbed in with a rotary floor buffer fitted with a Black pad. A wet vacuum was then used to hoover up the slurry.

Next step was to treat the tiles to an acid rinse to neutralise any latent alkaline salts in the floor that might lead to efflorescence later and further clean up the tiles by removing grout hazing. I used Tile Doctors Acid Gel for this and worked it in this time with a coarse 200-grit diamond pad. After another rinse and extraction using the wet vacuum.

Victorian Tiled Hallway Floor During Restoration Chesham

To further improve the appearance of the tiles and blend the replacement tiles in with the original I continued the cleaning with finer grades of diamond burnishing pads until satisfied the floor was as good as it could be. Afterwards the floor was given a light mop with Tile Doctor Neutral Tile Cleaner to remove any dust etc and left it to dry off for a couple of hours. At the end of day 3 it was dry enough to accept a single base coat of Tile Doctors Colour Grow, this is a colour enhancing sealer that will help blend the new and old tiles and give a uniformed look.

Sealing a Victorian Tiled Hallway and Porch Floor

Day 4 the final day of the job I arrived and buffed over the floor with a White pad to get rid of any wet patches from putting the sealer down the day before. Then I applied two coats of using Tile Doctors X-Tra Seal onto the floor leaving a good hour in between each coat for the seal to soak into the pores of the tile and create a nice hard layer to protect them. Once both coats had dried, I went over the floor with a 3000-grit pad to give the floor a slight shine.

Victorian Tiled Hallway Floor After Restoration Chesham

The client was very happy with the finished result and before leaving I took time to recommend the use of Tile Doctor Neutral Cleaner for on-going cleaning. It’s a neutral pH cleaner that’s ideal for the regular cleaning of sealed tiles, supermarket cleaning products are generally too strong for this job and will erode the sealer.

Victorian Tiled Porch Floor After Restoration Chesham


Professional Restoration of a Victorian Tiled Hallway and Porch in Buckinghamshire

Cracked Victorian Hallway and Porch floor tiles Restored in Chesham Read More »

Scroll to Top