Milton Keynes Tile Cleaning

Milton Keynes Tile Cleaning

Welcome to my Work History archive where you will find examples of the cleaning and renovation of tiles carried out in Milton Keynes.

Terracotta Floor Before and After Cleaning Milton Keynes

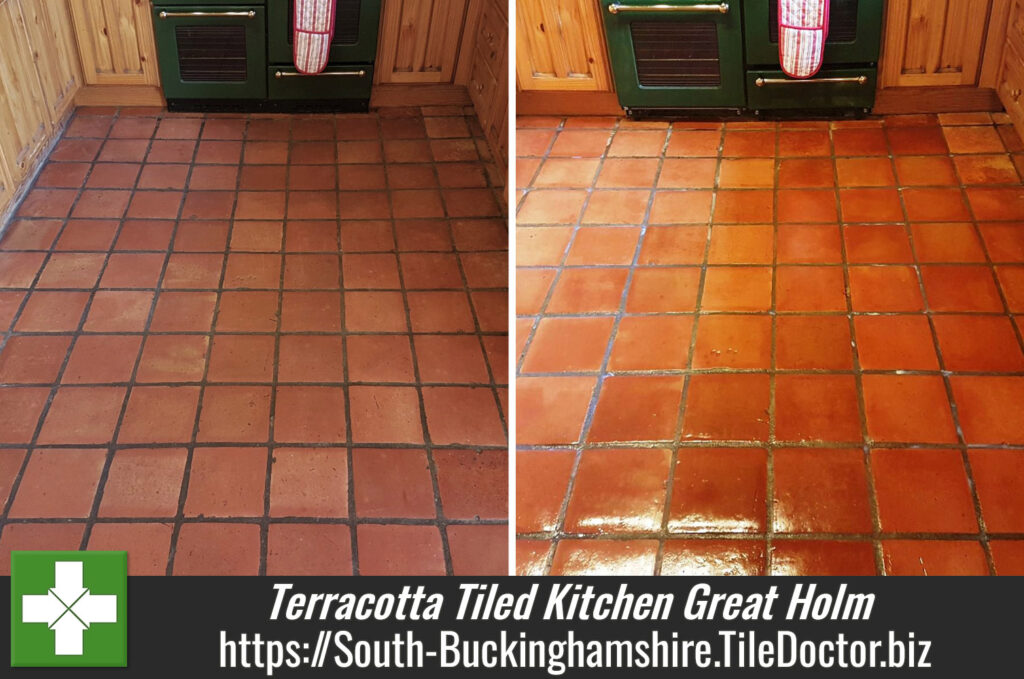
Renovating a Terracotta Tiled Kitchen Floor in Great Holm

The Terracotta tiled kitchen floor in the kitchen house of this house in the residential district of Great Holm, just outside of Milton Keynes had been laid some time ago and was now well worn and dirty. The houses in the area are not that old and so I suspect the floor may have been down since the house was built.

The Terracotta tiles had not been professionally cleaned for many years and the floor had lost its’ lustre where the sealant had worn away and dirt had become ingrained in the tile, the Grout had also darkened. I went over to look at the floor and perform a test clean, so I could give the owner an accurate quote for renovating the floor.

Terracotta Floor Before Cleaning Milton Keynes
The quote was accepted, and we agreed a date to do the work which would take place over a four-day period. One day to clean the tiles, two days between for it to dry and one day to seal the floor in order to protect it going forward.

Deep Cleaning Terracotta Kitchen Tiles

We started by applying a strong solution of Tile Doctor Pro-Clean to the floor. Pro Clean is a concentrated, multi-purpose high-alkaline cleaner, stripper and degreaser. It is ideal for heavily soiled and neglected floors. After about 10 minutes dwell time we used our scrubbing machine fitted with a black buffing pad to scrub the floor and loosen the ingrained dirt from the pores of the tile.


A wet pick up vacuum was then used to remove the now dirty cleaning solution, we then thoroughly rinsed the floor by hand to remove any trace of cleaning product and so we could inspect the tiles to see if more work was required. In this instance I felt the floor could do with more work, so the process was repeated, and the edges scrubbed by hand.

We let the floor dry a little over lunch but noted a few of the areas were not quite perfect. To get the best result on these areas we then used Tile Doctor Oxy-Gel, this is a stronger gel-based version of Tile Doctor Pro Clean which is perfect for spot cleaning specific stubborn areas.

With the floor clean it was time to turn our attention to the grout and for this we used more Tile Doctor Pro-Clean and a specialized narrow grout brush to meticulously scrub each grout line. The floor was then completely rinsed with water.

Terracotta Floor During Cleaning Milton Keynes
The floor was now spotless but before it could be sealed it would need to be dry, so we left specialised drying equipment in the room and allowed the floor two days to completely dry out.

Sealing a Terracotta Tiled Kitchen Floor

After two days we returned, we used a moisture meter to test that the floor was dry enough to seal. It was thoroughly dry, so we were able to carry on with applying the sealer which can be quite time consuming as you have to wait for the first coat to dry before applying the next. In this case the Terracotta proved to be very porous which is not unusual for a clay tile and it took eight coats of sealer before I was satisfied the tiles were fully sealed. The sealer used to protect the floor was Tile Doctor Seal and Go which leaves a nice subtle satin finish on the tiles. Tile Doctor have a variety of sealers available and we select the sealant to suit dependent on the finish the client wishes to achieve.

The customer was absolutely delighted and left a great review (please see the feedback below)

“Andrew explained the process clearly and the floor looks absolutely stunning. It is hard to believe the difference between before and after. I would have no hesitation in recommending Andrew.

Fiona W, Great Holm”

Terracotta Floor After Cleaning Milton Keynes
 

Professional Cleaning of Terracotta Tiled Kitchen in South Buckinghamshire

Renovating a Terracotta Tiled Kitchen Floor in Great Holm Read More »

Terracotta Tiles After Cleaning Buckingham Farm Cottage

Terracotta Kitchen Tiles Refreshed in Buckingham Farm Cottage

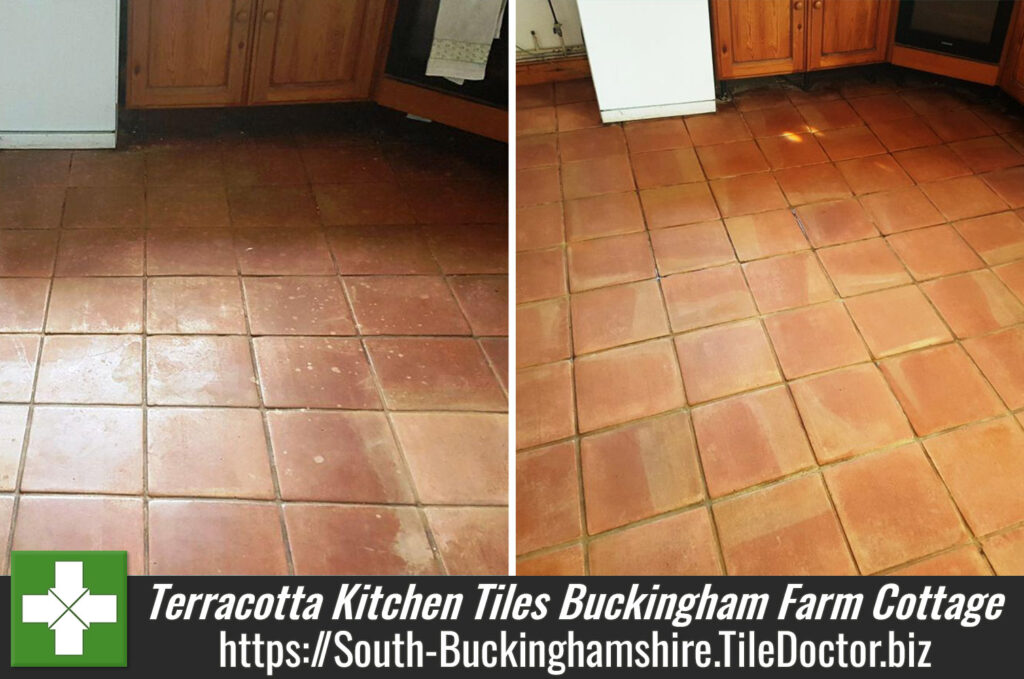
I was recently contacted about the restoration of a fantastic example of a Terracotta tiled floor in the kitchen of a farm cottage just south of Buckingham.

Terracotta Tiles Before Cleaning Buckingham Farm Cottage
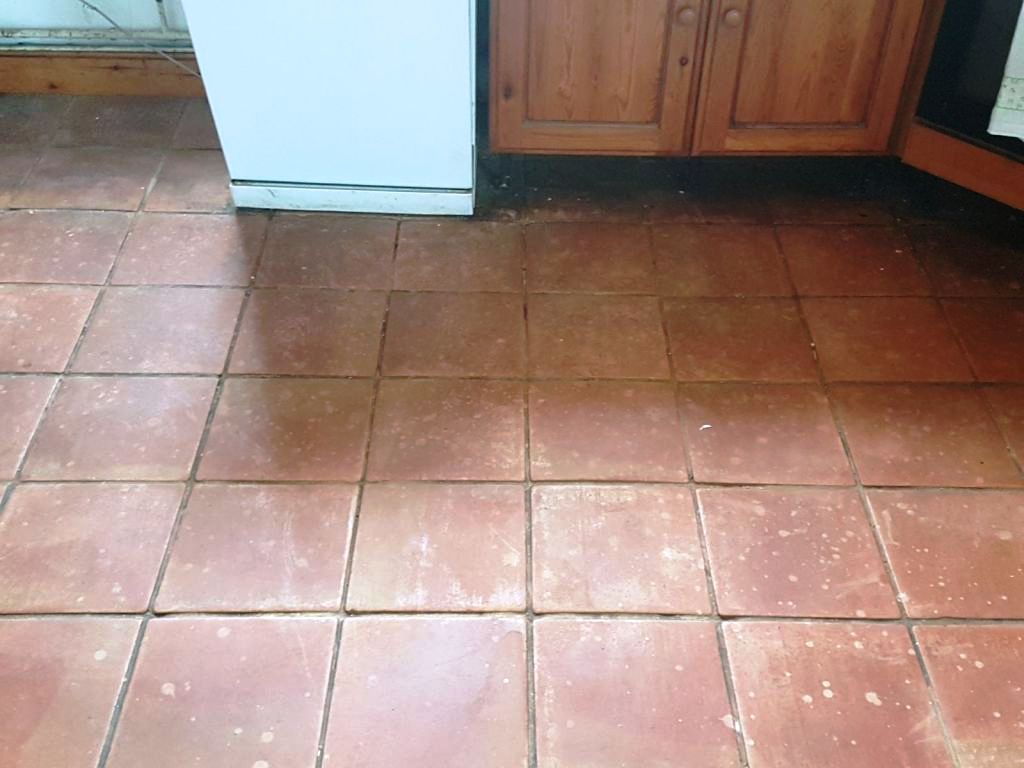
There was a very noticeable build-up of dirt on the tiles and in the grout lines. Additionally, there were lots of white spots on the tiles in front of sink area because of a caustic soda spillage. Caustic soda is also known as sodium hydroxide, as is commonly used as a drain unblocking agent. It’s a highly alkaline product and isn’t very friendly to Terracotta.

Terracotta Tiles Before Cleaning Buckingham Farm Cottage
The grout was also stained and naturally, the homeowner was keen to get her floor back into the best shape possible – and I was on hand to see what could be done.

Terracotta is a very attractive and useful material that has been in use for over two millennia throughout the world. It has been used perhaps most famously for sculptures and other forms of art, although it has since the days of the Ancient Romans been used as a building material – including in the form of floor tiles. It’s still a popular choice for tiles amongst homeowners today, since Terracotta tiles are typically thicker, and the red colour adds a warm country feel to the home.

Cleaning Stained and Dirty Terracotta Kitchen Tiles

Before beginning the restoration, I first removed the kickboards from underneath the kitchen units to protect them from splashes from the cleaning products I would be using.

Once this had been done, I got straight into deep cleaning the tile and grout lines using a strong dilution of Tile Doctor Pro-Clean which is a strong alkaline cleaner. To get the best result I left the solution to soak into the pores of the tile for approximately ten minutes before being agitated with a black scrubbing pad fitted to a rotary machine.

The floor was then rinsed with fresh water and the resulting slurry of soiled cleaning solution was promptly extracted using a wet vacuum. This process left the tiles and grout looking much cleaner and fresher, however, the white spots caused by the caustic soda would need something extra to remove them.

I treated these spots using Tile Doctor Acid Gel in combination with a steam machine. Acid Gel is a mixture of phosphoric and hydrochloric acids in gel form, and can be used to neutralise alkali-based stains such as these. We also commonly use it to treat efflorescence (mineral salt deposits).

The floor was then once again rinsed with fresh water to remove any trace of cleaning products and neutralise the floor, before being left to dry off fully for two days.

Sealing Terracotta Kitchen Tiles

I returned after 48 hours and the floor was dry enough to be sealed. The customer wanted to retain the natural-looking and rustic appearance of the Terracotta, so I suggested that we seal the tiles using Tile Doctor Colour Grow. This sealer is impregnating and colour-intensifying (so it emphasises the patina of the stone), but also leaves a matte finish.

Terracotta Tiles After Cleaning Buckingham Farm Cottage
The after photos show the result of the restoration – I job well done if I say so myself. And certainly, my customer agreed!

Terracotta Tiles After Cleaning Buckingham Farm Cottage
 

Professional Cleaning of a Stained Terracotta Kitchen Floor in Buckinghamshire

Terracotta Kitchen Tiles Refreshed in Buckingham Farm Cottage Read More »

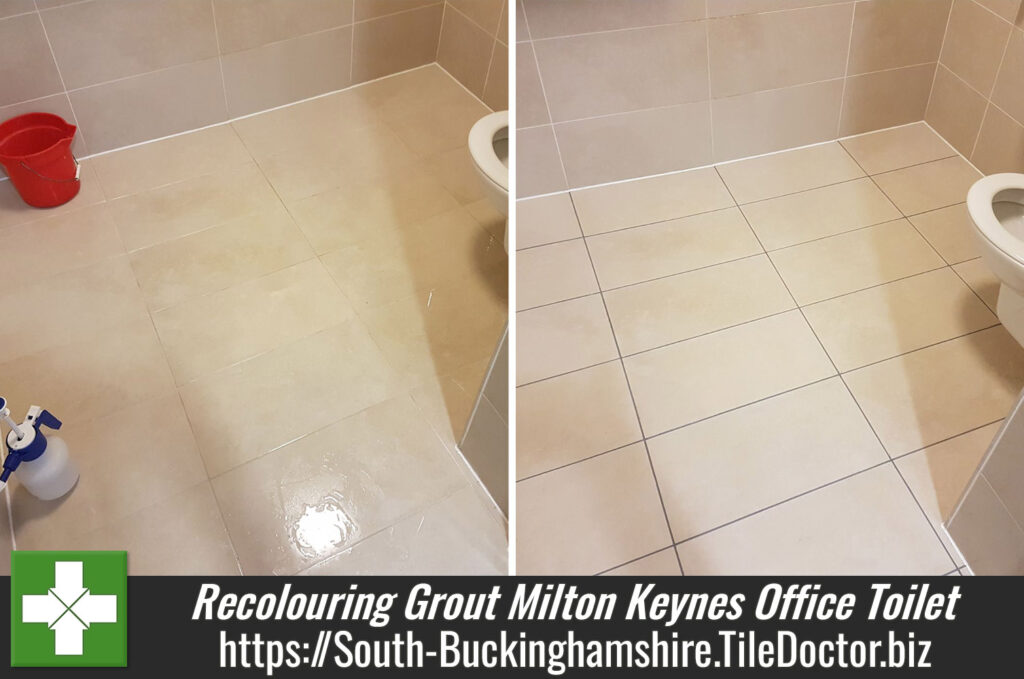
Commerical Porcelain Toilet floor Milton Keynes Before and After Grout Colouring

Recolouring Stained Grout in Milton Keynes Office Toilet

Although much of the work Tile Doctor does is residential were more than happy to take on commercial tile cleaning jobs, as well. In fact, many office buildings contain very nice tiled kitchens and bathrooms, but the cleaners who visit them daily are rarely have the right training and products to keep stone, tile and grout looking it’s best.

In some cases, a long period of time passes before the facilities manager or cleaning company reach out to seek help from companies like Tile Doctor and by this time the tiles can be a very bad way. With this in mind I received a call from an office manager in Milton Keynes who needed help to restore the appearance of the tile and grout in a Porcelain tiled toilet.

Commerical Porcelain Toilet floor Milton Keynes Before Cleaning
You can see from the photograph that the White floor grout had become stained and unsightly through use and a lack of adequate grout cleaning. The owner of the building had decided, in fact, that he wanted to change the grout to a dark colour but was concerned about the cost and time it would take to remove the original grout and applying new.

I suggested to him that we give the tile and grout a deep clean and then simply recolour the grout with a Tile Doctor Grout Colourant. Additionally, it’s a relatively quick process which could be done outside of office hours to minimise disruption. The customer was happy with this solution, so I we agreed a time for me to come back and carry out the work.

Cleaning and Grout Recolouring of a Porcelain Tiled Office Toilet

The restoration process began with a deep clean of the tiles using Tile Doctor Pro-Clean, which is a strong alkaline tile and grout cleaner. The product was applied to the tile and grout and then left to dwell for a short period before being worked in with a large scrubbing pad fitted to a rotary machine. Pro-Clean very reliably breaks down ingrained dirt and muck and can even be used to remove sealers in a concentrated form.

Next, I paid special attention to freshening up the stained grout lines. This was done using Tile Doctor Grout Clean-Up, an acidic product which is usually used to remove grout smears from the tile surface but in this case applied to etch the grout surface to ensure a stronger bond with the colourant.

The tile and grout was rinsed and then dried before I could continue with the final step of recolouring the grout lines to make them darker, as per the customer’s request. This was done using the Tile Doctor Grout Colourant in Grey, which is just one of ten colours available. Other options include White, Chocolate, Sandstone and Black.

The Grout Colourant serves not only to recolour and rejuvenate the grout lines but also adds a barrier over the grout sealing it in and protecting it from further staining.

Commerical Porcelain Toilet floor Milton Keynes After Grout Colouring
I think you’ll agree, looking at the photo of the result below, that the toilet now looks much smarter and more professional. The customer was very happy with the outcome of the work and left me the following feedback on the Tile Doctor feedback system.

Great diligent work undertaken by Andrew-very pleased with the outcome.
Mr. Hirani, Milton Keynes 03 February 2018

Professional Renovation of a Stained and Discoloured Porcelain Tiled Office Toilet in Buckinghamshire

Recolouring Stained Grout in Milton Keynes Office Toilet Read More »

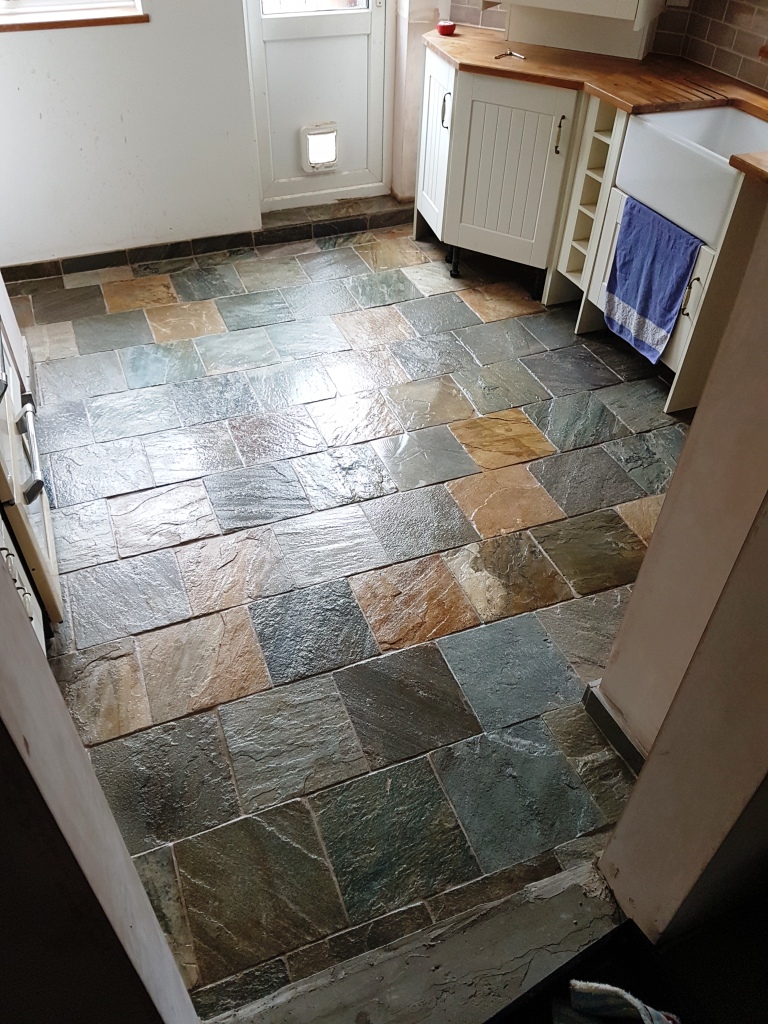
Slate Kitchen Floor After Cleaning in Milton Keynes

Restoring a Poorly Sealed Slate Kitchen Tiled Floor in Milton Keynes

Sealing is a fundamental part of any stone floor installation. If your builder or tiler hasn’t sealed your floor, he’s done something wrong – and it can cause significant problems. To the untrained eye, it may be difficult to tell whether a floor has been sealed, but you will quickly see that an unsealed floor attracts a lot of ingrained dirt and loses its lustre easily over time.

This was a problem for one of my recent customers, who lives in Milton Keynes in Buckinghamshire. They have a Slate tiled Kitchen floor which had been laid approximately 5 years prior, but had not been sealed properly on installation – and had not received any professional treatment since.

Consequently, the floor had become difficult for the customer to keep clean and it had lost its lustre and coloration due to ingrained dirt. Additionally, recent building works had left thick deposits of plaster on the tiles.

Slate Kitchen Floor Before Cleaning in Milton Keynes

Cleaning a Dirty Slate Tiled Kitchen

To begin restoring the Slate tiles, I applied Tile Doctor Pro-Clean, which is a powerful alkaline-based cleaner for natural stone. I mixed a strong dilution of the product, spread it liberally across the area and left it to dwell for 20 minutes to seep into the pores of the stone.

Next, I scrubbed it into the stone using a brush fitted to a heavy weight rotary machine, before rinsing the floor with a high-pressure water and wet extraction unit.

The next stage of the cleaning process was to get rid of the plaster deposits and some of the heavier stains. To deal with these I needed to apply an even stronger cleaner, known as NanoTech HBU (Heavy Build-Up Remover).

As its name suggests, the product uses nano-sized cleaning particles to penetrate beneath difficult stains to dissolve them and lift them out. I did this in combination with a steamer to help loosen up some of the plaster.

Sealing a Slate Tiled Kitchen

After allowing the floor to dry overnight, I returned to the property the next day to seal the tiles. I did this using five coats of Tile Doctor Seal and Go, which is a double-action sealer: not only does it provide a robust, topical seal, it also provides a durable low-sheen finish which is aesthetically pleasing.

Slate Kitchen Floor After Cleaning in Milton Keynes

The sealer has done a fantastic job of emphasising all the natural colours in the Slate and the appearance of the entire floor has been lifted. The customer was really pleased with the restoration which certainly had been a long time coming.

Restoration of a Dirty and Stained Slate Tiled Kitchen Floor in Buckinghamshire

Restoring a Poorly Sealed Slate Kitchen Tiled Floor in Milton Keynes Read More »

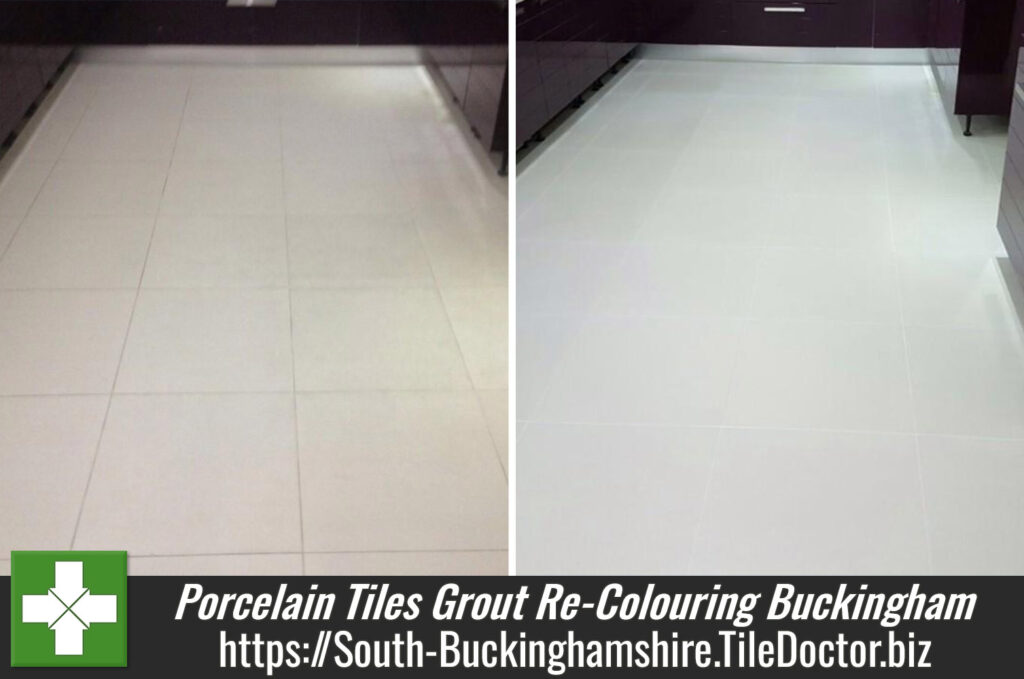
Porcelain Floor After Cleaning in Buckingham

Tile Cleaning and Grout Re-Colouring of a Porcelain Tiled Kitchen in Buckingham

Grout is an incredibly important feature of tiled floors, not just from a structural perspective, but from an aesthetic perspective too. If the grout lines are dirty and stained, it ruins the overall look of the floor. It’s important to try and keep them clean, but with grout being rough in nature it does attract dirt and if left un-checked it can easily get to the point where cleaning becomes very difficult.

A good case in point was this Porcelain tiled kitchen floor at a property in the historic university town of Buckingham. The floor had been installed approximately eight years prior and while during this time the property owner had made the best efforts to keep the tiles clean, the dirt and grime had begun to build up – particularly in the grout lines.

I visited the property to see what could be done, starting with an initial test clean with a strong solution of our high alkaline cleaner, Tile Doctor Pro Clean. The tiles came up beautifully, but due to the extreme porosity of the grout, some of the dirt had been absorbed too deeply into the grout to get it completely clean.

Porcelain Floor Before Cleaning in Buckingham

The customer was worried that this would mean ripping all the grout out and re-grouting, which is a messy and time consuming process. As an alternative, I advised him that recolouring the grout would be the better option, using one of the excellent grout colorants made by Tile Doctor which are available in ten popular colours.

These products not only restore a clean and uniform appearance to the grout, they also provide a waterproof barrier which prevents any dirt and grime from penetrating the grout in the future. The recolouring process is a relatively quick, affordable, and a tidy alternative to re-grouting.

Cleaning Porcelain Tiles and Grout

Impressed by the efficiency of the Pro Clean product and the cleanliness of the test patch, the customer requested that we go ahead and deep clean the tiles and re-colour the grout.

The work took two days. On the first day, we deep cleaned all the tiles and grout using the same strong solution of Pro-Clean. The solution was applied to the floor and left to dwell for approximately ten minutes and from there I used a rotary machine fitted with a black scrubbing pad to loosen the soil from the tiles.

Once the floor had been thoroughly scrubbed, I used our wet pick up and rinsing machine to remove all the dirty water, and rinse the floor with clean water.

Porcelain Floor During Cleaning in Buckingham

Next we moved on to cleaning the grout. I started by applying Tile Doctor Pre-Treatment Cleaner and left it for approximately 15 minutes before scrubbing it in by hand using a stiff grout brush.

This process serves two purposes: firstly, it helps to remove as much dirt as possible from the grout lines prior to re-colouring and secondly, the acidity in the product etches the grout slightly, helping to make a better bond with the Grout Colourant.

Once the process was complete, I rinsed and dried the floor one more time and left it to dry off overnight.

Recolouring Grout

The next morning, I returned to colour and seal the grout with an Ivory Grout Colourant as selected by the customer. The process is quite straight forward and involves using a small brush to carefully apply the colorant along each grout line. When I was finished, I made sure to clean any excess product off the tiles before it had time to dry.

Finally, I buffed the floor with a fine white buffing pad, leaving the tiles looking clean and fresh, with the grout uniform. The customer was absolutely delighted with the service and the results.

Porcelain Floor After Cleaning in Buckingham

Restoring the Appearance of Porcelain Tile and Grout in a Buckinghamshire Kitchen

Tile Cleaning and Grout Re-Colouring of a Porcelain Tiled Kitchen in Buckingham Read More »

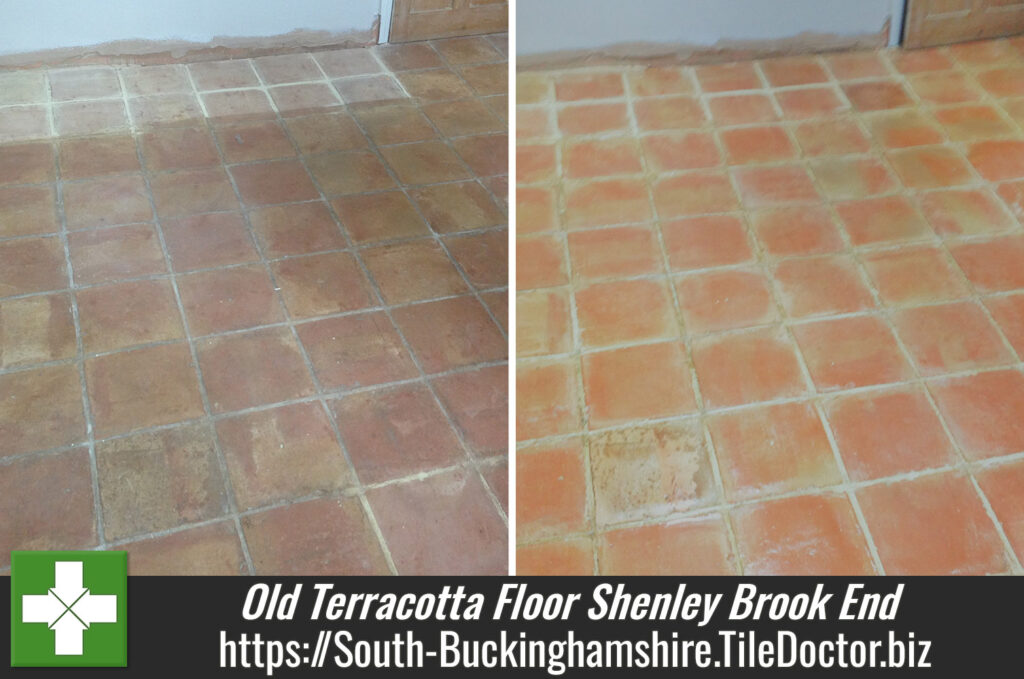
Old Terracotta Floor After Cleaning in Shenley Brook End

Old Terracotta floor refurbished in Shenley Brook End

This old Terracotta floor in Shenley Brook End near Milton Keynes was already dirty with very little sealer intact when our customer moved into the property. Then after having extensive building work done throughout the property they were in desperate need of a Tile Doctor service to improve the look of the floor.

Old Terracotta Floor Before Cleaning in Shenley Brook End

Cleaning Old Terracotta Floor Tiles

We started by applying a strong dilution of Tile Doctor Pro-Clean to the floor which is our go to cleaning product for all types of Tile, Stone and Grout. After approximately 20 minutes of dwell time we scrubbed the floor with a black scrubbing pad fitted to a rotary machine. This broke down most of the dirt and removed any remaining sealer. Once the whole floor had been treated in this manner it was rinsed thoroughly with water which was then extracted using a wet vacuum.

Having removed the soiled cleaning solution, we could see the result achieved on the floor and although there was a massive improvement there were some tiles we still were not totally happy with. We went back to these tiles and applied a stronger Tile Doctor product called NanoTech HBU which stands for Heavy Build-Up remover. We gave this an hour to dwell.

Whilst the NanoTech was doing its magic on the problem tiles we went to work scrubbing all the grout lines by hand using more Pro-Clean. Once we had finished cleaning the grout we gave the whole floor one more rinse and were pleased to see the problem tiles were now looking much better.

Sealing Old Terracotta Floor Tiles

We then left the floor to dry off completely overnight and returned the following day to seal the floor. Made from clay Terracotta is very porous and needs to be sealed to stop dirt becoming ingrained in the tile, it also improves its general appearance.

To fully seal the floor, we used six coats of Tile Doctor Seal and Go which will provide complete protection against stains and dirt, Seal and Go also adds an appealing satin sheen to the tile.

Old Terracotta Floor After Cleaning in Shenley Brook End

For an old floor that has been exposed to building work it’s now looking much cleaner and healthier; more importantly the customer was delighted with the service and left the following glowing review which is always appreciated:

Andrew and his colleagues (including Gemma in the office) could not have been more helpful and courteous. They are some of the tidiest tradesmen we’ve met! The results have exceeded our expectations and the service is very cost-effective compared to the cost of a new tiled floor, so happy customers all round. Thanks again!

Professional Terracotta Floor Renovation in Buckinghamshire

Old Terracotta floor refurbished in Shenley Brook End Read More »

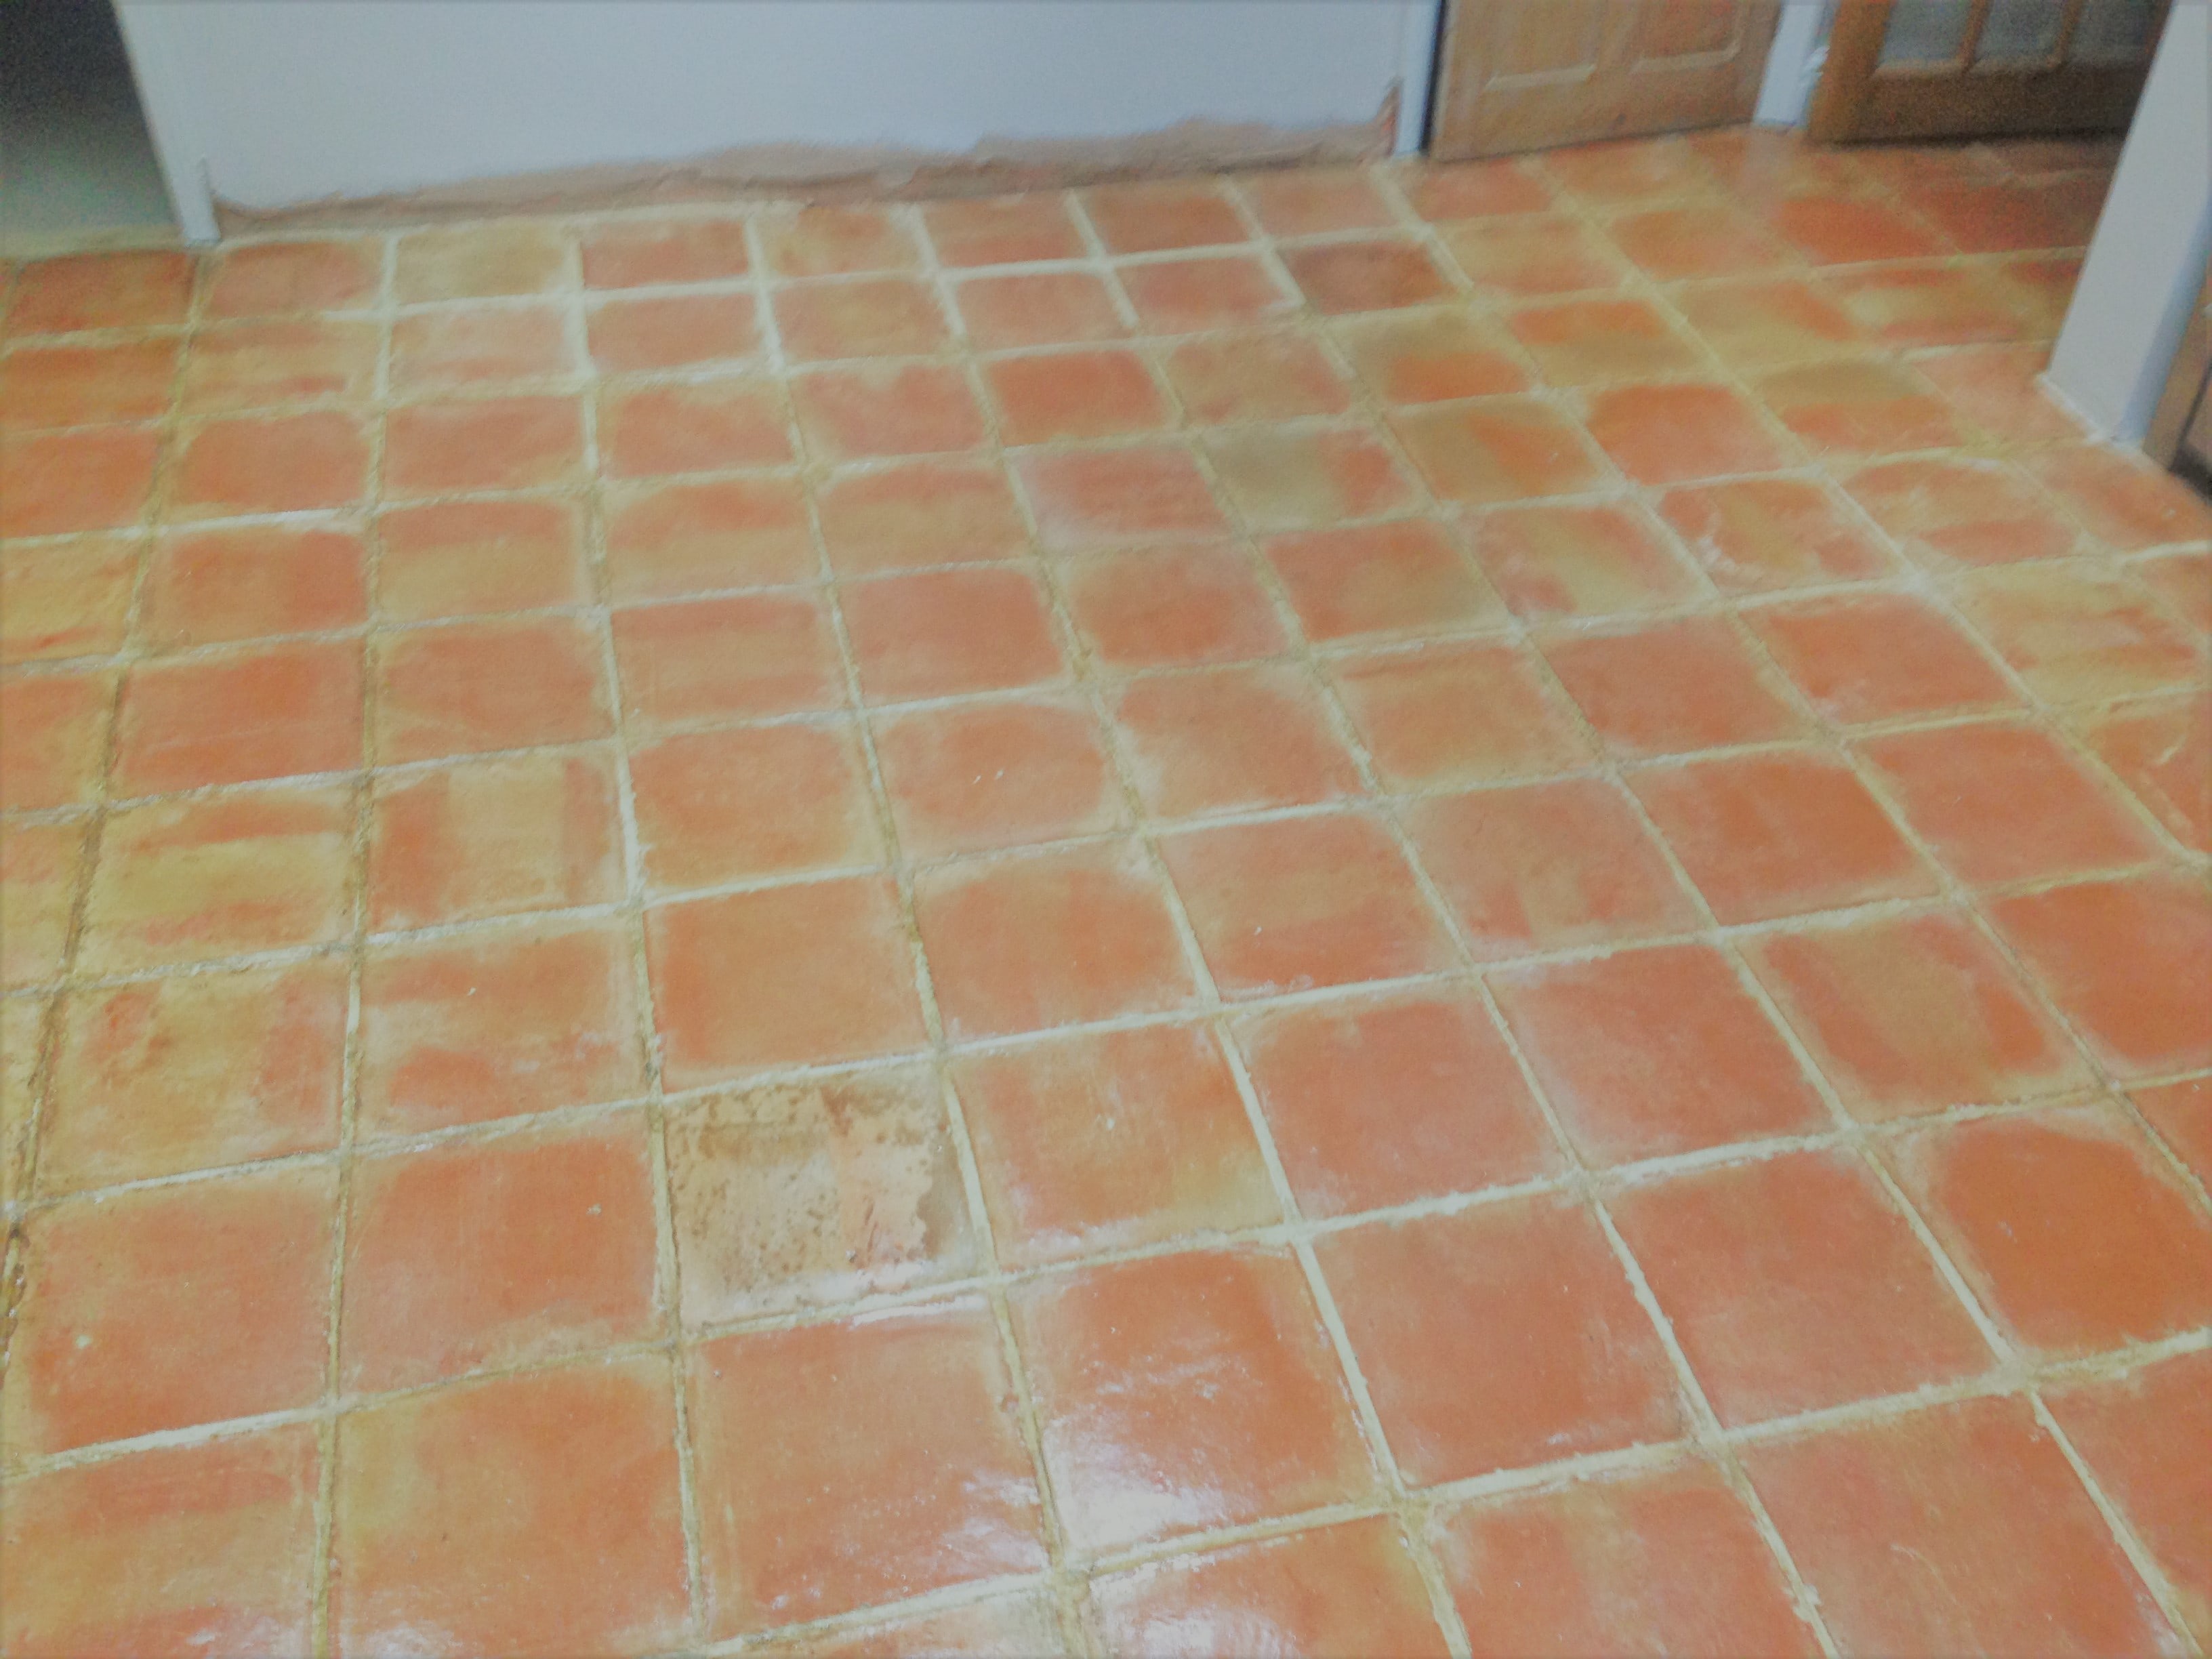
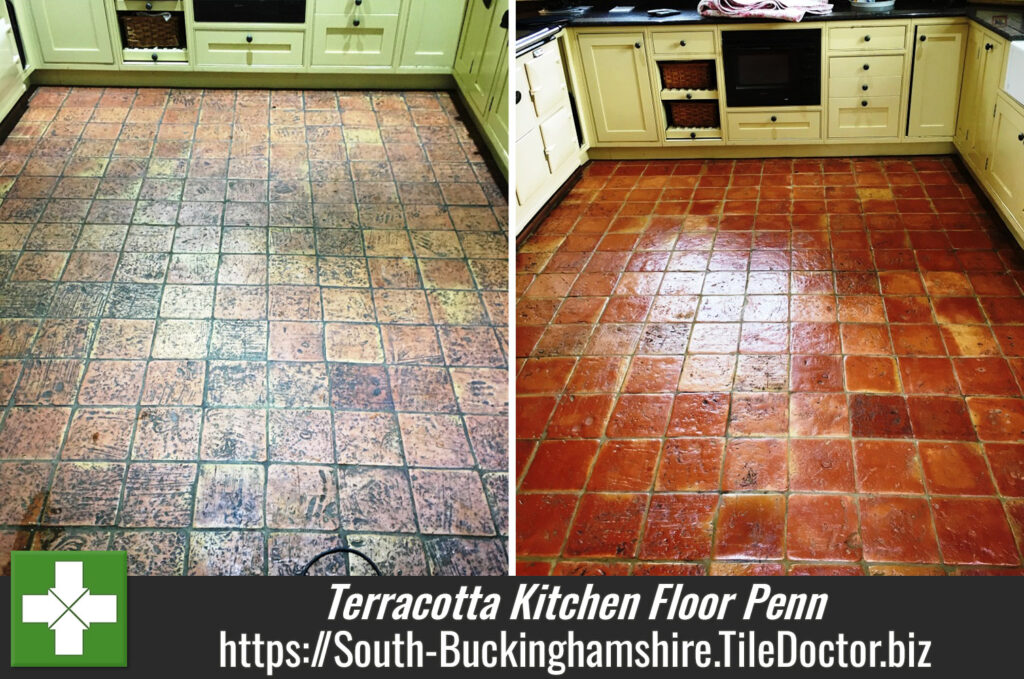
Terracotta Tile Before and After Cleaning in Penn Bucks

Heavily Soiled Terracotta Kitchen Floor Transformed in Penn

The new owner of this house in the very old and quaint English village of Penn, Buckinghamshire wanted to refresh the look of the Terracotta tiled kitchen floor before they moved in. It had suffered from a heavy soil build-up of dirt over time due to inadequate maintenance and ineffectual sealer.

Since Terracotta (which came into popular use in the West in the 19th century) is highly porous, large amounts of dirt can become ingrained very quickly if not taken care of. Restoring this floor would be a two-day job, including thorough cleaning and stripping, as well as the application of a fresh sealer to provide long-term protection.

Terracotta Tile Before Cleaning in Penn Bucks

Cleaning a Heavily Soiled Terracotta Tiled Floor

The first day was spent giving the tiles a deep clean. To begin, I mixed a strong solution of the heavy duty alkaline cleaner, Tile Doctor Pro Clean, which a versatile product suitable for tackling heavy soil build up on a range of natural stone floors.

The solution was spread evenly across the surface area of the floor, before being worked into the stone with a commercial rotary machine fitted with an abrasive scrubbing pad. This really helped to break down the layers of muck. Next, I paid particular attention to the grout lines, scrubbing them with the acid-based Tile Doctor Grout Clean Up to remove dirt and neutralise any grout haze and mineral salts that had built up. Thanks to this the stained grout lines were restored to their original colour.

The final task on day one was to strip away the remaining failed sealer using Tile Doctor Remove & Go, which is specially designed for this purpose. Similar to earlier, the product was worked in using the rotary machine and abrasive pad. Once the cleaning process was complete, I washed the floor to remove all chemicals and slurry, before leaving the floor to dry naturally overnight.

Sealing a Terracotta Tiled Floor

Returning to the house the next day, I firstly checked for any remaining moisture on the, which is important as it can negatively impact sealer performance. With everything in good condition I proceeded to seal the tiles using the solvent-based, topical sealer known as Tile Doctor Seal and Go.

I applied multiple coats in order to build up sufficient protection on the surface of the tiles to reduce the damage of future spillages and staining. The sealer will also provide a durable and aesthetically pleasing low sheen finish.

Terracotta Tile After Cleaning in Penn Bucks
As you can see from the before and after photographs, a remarkable difference was made to the condition and appearance of this Terracotta tiled floor. My customer was very pleased with the results, and I’m sure the new home owner will be even more pleased to find the floor looking great when they move in.

Deep Cleaning a Heavily Soiled Terracotta Tiled Floor in Buckinghamshire

Heavily Soiled Terracotta Kitchen Floor Transformed in Penn Read More »

=================================

South Buckinghamshire Tile Doctor

================================= Read More »

Scroll to Top