Gerrards Cross Tile Cleaning

Gerrards Cross Tile Cleaning

Welcome to my Work History archive where you will find examples of the cleaning and renovation of tiles carried out in Gerrards Cross.

Porcelain Tile and Grout Renovation Chalfont St Peter

End of Tenancy Renovation of Porcelain Tile and Grout in Chalfont St Peter

I recently paid a visit to a rental property in Chalfont St Peter which had Porcelain tiled floor which needed an End of Tenancy Clean. Porcelain tiling is a great choice for a rental property as its very to maintain however in this case it was the grout that was letting the floor down.

Porcelain Tiled Floor Before Cleaning Chalfont St Peter

It seems the previous tenant had tried using a white grout pen to colour the grout lines when they first moved in and since then the colourant has started flaking off resulting in a very patchy appearance and the exposed grout becoming darker.

The client wanted me to come in and clean the floor and to make the grout lines unison. The property wasn’t going to be rented out again as the owner was planning to move back in after living abroad for several years.

Deep Cleaning Porcelain Tile and Grout

On the first day I started giving the Porcelain tile and grout a much needed deep clean using a Rocky floor machine fitted with a Silicon Carbide brush and lubricated with a strong dilution of Tile Doctor Pro-Clean. Carbide brushes are perfect for hard floor cleaning and in this case had the additional advantage of cleaning away the flaky grout pen.

This cleaning process was applied section by section vacuuming up the slurry with a wet vacuum along the way. I then hand scrubbed the grout lines with Grout Colourant Pre-Treat Cleaner which is an effective ready-to-use cleaner designed to lightly etch the surface of the grout to ensure a better adhesion with the colourant. It also removes dirt, soil, soap scum and hard water deposits from grout joints. Once everywhere had been treated I mopped the floor with Neutral Tile Cleaner, rinsed with water, extracted with the wet vacuum again before finally leaving the floor to dry off overnight.

Applying White Grout Colourant to a Porcelain Tiled Floor

On day two I knew my main problem would be making sure that the White grout colourant was able to adhere to those areas of grout that had been coloured with the pen. I didn’t have to worry though as it worked perfectly. The application basically involves using a small brush to push the colourant into the grout lines and gently cleaning up the edge of the tiles to remove the excess colourant before it can dry.

After the first coat dried it brighten the floor massively however in some of areas you could still make out the old from the new so I needed to give the grout lines a second coat using the same technique as before. Once the second coat had been applied, I allowed it to settle and go off before giving the floor a check over to make sure I was happy with the result.

Porcelain Tiled Floor After Cleaning Chalfont St Peter

My customer was over the moon with the difference and was much relieved that the floor had been restored after the condition the previous tenants had left it in.


Professional Grout Restoration Services in Buckinghamshire

End of Tenancy Renovation of Porcelain Tile and Grout in Chalfont St Peter Read More »

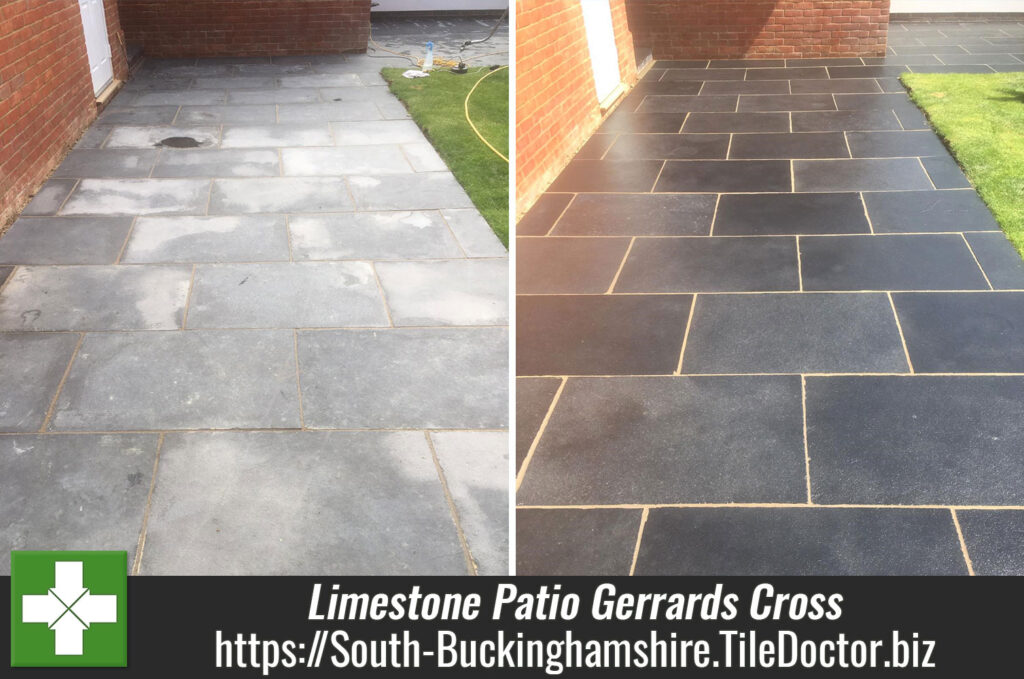
Black Limestone Patio Renovation Gerrards Cross

Dull Black Limestone Patio Renovated in Gerrards Cross

This customer from Gerrards Cross contacted me about their Black Limestone patio which had not been laid that long ago but was already in need of attention. Having spoken to the owner on the phone I arranged to visit the property so I could assess the issues in full and prepare a quote.

Black Limestone Patio Before Renovation Gerrards Cross

I visited the property to survey the patio and could immediately see that the Black Limestone flags looked washed out and grey, nothing like the beautiful dark stone he was expecting. It was clear that the installers hadn’t done anything to the stone after laying the patio, excess grout (grout haze) needed removing and no protective sealer had been applied resulting in staining from plant pots and spillages.

I recommended a restorative treatment involving deep cleaning, removing the grout smears, oiling to restore texture and the application of a colour enhancing sealer. This process would restore its original appearance and get the patio looking as it should.

Black Limestone Patio Before Renovation Gerrards Cross

Happy to hear the situation could be resolved my quote was accepted and a date scheduled for the work to begin.

Cleaning and Restoring a Black Limestone Tiled Patio

I arrived on the first day and started by helping the customer move furniture off the patio so I had a clear work area. Then work started off by scrubbing the stone with a Rocky floor machine fitted with a silicon carbide brush. This action gets into the stone giving them a deep clean, with the brush I also applied Tile Doctor Pro-Clean which is a strong alkaline cleaner and left that down for fifteen minutes to soak in first. With the dirt released from the stone onto the surface a wet vacuum is used to hoover up the resultant slurry.

Once cleaned the patio was inspected and I could see there was still evidence of grout haze on the Limestone so I used a 400-grit burnishing pad with water to take if off and then left the patio to dry out overnight ready for sealing. This work as actually carried out in the summer of 2022 so the weather wasn’t a problem.

Sealing a Limestone Tiled Patio

On the second day work started by checking the moisture readings of the Limestone tiles using a damp meter. The readings were within tolerance so I was able to apply an initial coat of Tile Doctor Colour Grow sealer which is a colour enhancing impregnator that soaks into the pores of the stone. A very thick first coat was applied and allowed to soak in which it did very quickly.

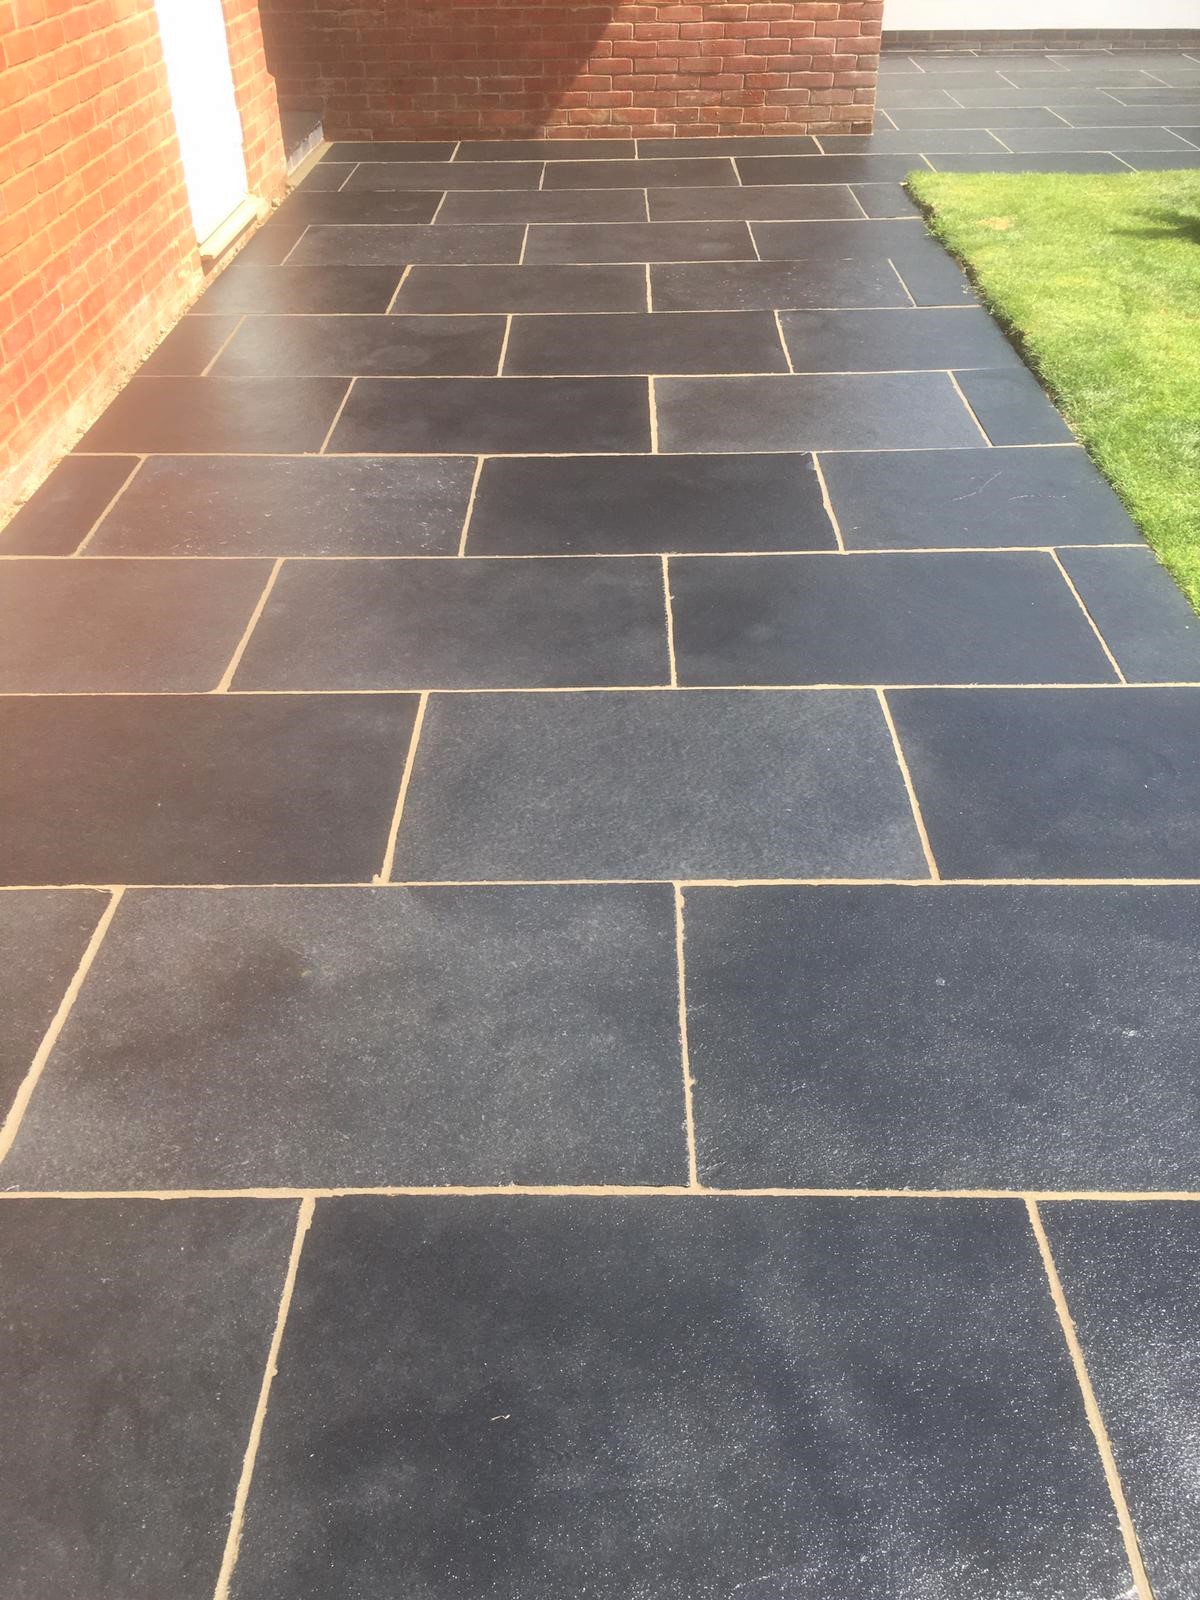
This was then followed by a thick coat of Tile Doctor Stone Oil and allowed to soak in for roughly an hour before buffing it with a cloth to collect any excess residue. The Stone Oil gave the tiles a very deep black colour which seeped into the stone and this is exactly the appearance my customer wanted. It was quite the transformation from the dull washed-out looking patio that was here before.

Black Limestone Patio After Renovation Gerrards Cross

Finally, I applied a third and final coat of Tile Doctor Ultra-Seal resulting in a resilient sandwich of coatings that should keep the stones appearance for some time to come. This last coat was applied using a microfibre cloth allowing it to seep into the stone. Once I felt the Black Limestone had dried sufficiently, I used a white buffing pad to buff over the patio and remove any residue.

The customer was very happy with his new patio and recommended me to a neighbour who had a similar problem with their patio.

Black Limestone Patio After Renovation Gerrards Cross


Professional Restoration of a Black Limestone Patio in Buckinghamshire

Dull Black Limestone Patio Renovated in Gerrards Cross Read More »

Smooth Indian Sandstone Kitchen Floor Renovation Gerard's Cross

Smooth Indian Sandstone Kitchen Floor Transformed in Gerrards Cross

This client in Gerrard’s Cross wanted to be able to see the different colours and features in their Sandstone Kitchen floor and to remove the ring marks which you can see in the photograph. They had just moved into the house in and loved the Stone floor but soon realised the previous owners hadn’t taken much care of it. They tried a selection of supermarket products to clean the floor but none of them made much of difference.

Smooth Indian Sandstone Floor Before Cleaning Gerrards Cross

I carried out a site visit and it was clear to me that what was once a light Sandstone have literally darkened with all the dirt it had absorbed. I was confident that the dark stone could be deep cleaned and lightened to give them what they wanted, and then protected with a fresh sealer to ensure it remained that way. I worked out a quotation which they agreed to, and we arranged a date for the work to start.

Deep Cleaning a Sandstone Tiled Kitchen Floor

Day one of the work started by deep cleaning the Indian Sandstone tiles and removing as much of the dirt that become stuck in the pores of the stone as possible. To do this the floor was wetted with a strong dilution of Tile Doctor Pro-Clean which is our go to tile and grout cleaning product.

After leaving it to soak in for ten minutes the solution was scrubbed int the stone and grout using a rotary floor buffer which was setup with a black scrubbing pad. This action drew the dirt and any remaining old sealer out to the surface where the soiling could be extracted with a wet vacuum.

The next step was to refinish the surface of the stone using a set of Tile Doctor’s Diamond Burnishing Pads. Starting with a 400-grit pad to remove the ring marks in the floor created from plant pots and then continuing through the different grits from 800 to 1500 grit which gave the floor a natural sheen and then a 3000-grit pad to finish. The floor is rinsed with water between pads and the slurry generated extracted with the wet vacuum as before.

The lower grit pads are applied with water to help lubricate the process however the last pad is applied almost dry with only a little water sprayed onto the floor so by the time the process in completed its well on its way to being dry.

Sealing a Sandstone Tiled Kitchen Floor

I left the floor to fully dry off overnight and came back the next day to apply the sealer. Before starting thought I gave the floor another run over with the 3,000-grit pad just to tighten the pores before sealing.

To seal two coats of Tile Doctors Ultra-Seal were applied, this is an almost invisible product recommended for use in food preparation areas that leaves the stone in a natural finish which was the effect my client had requested. They had long French patio doors leading onto the garden and wanted to allow as much light in as possible because before the floor was cleaned the room was quite dark.

After allowing the seal to soak into the Indian sandstone I gave the floor one last buff with a fresh 3000 grit pad to burnish more of a natural sheen onto the floor and to bring out the colour definition.

Smooth Indian Sandstone Floor After Cleaning Gerrards Cross

Once complete the floor was transformed from dark to light and looked so much cleaner. My client was very impressed by the work and surprised at how different the floor looked with the colours coming through and said she would recommend me to her friends and family in the area.

For after care I recommended the use of Tile Doctor Stone Soap which is a gentle cleaner that won’t degrade the sealer and will help keep the patina on the stone. Most supermarket tile cleaning products are simply too strong for a sealed floor so it’s always worth checking the label in detail before buying.


Professional Renovation of an Indian Sandstone Tiled Sandstone floor in South Buckinghamshire

Smooth Indian Sandstone Kitchen Floor Transformed in Gerrards Cross Read More »

Quarry Tiled Floor Before After Renovation Ruislip

Quarry Tiled Floor Hidden Under Lino Restored in Ruislip

This client in Ruislip had discovered a Quarry tiled floor hidden under two layers of old (and now horrible) lino. Unhappy with the Lino she decided the best thing to do would be to investigate having the Quarry tiles restored. It is amazing how tastes change over the years and classic period floors are definitely making a comeback. Period features like these are quite sought after and can add a lot of value to a property, so restoring it was a wise decision and worth investigating.

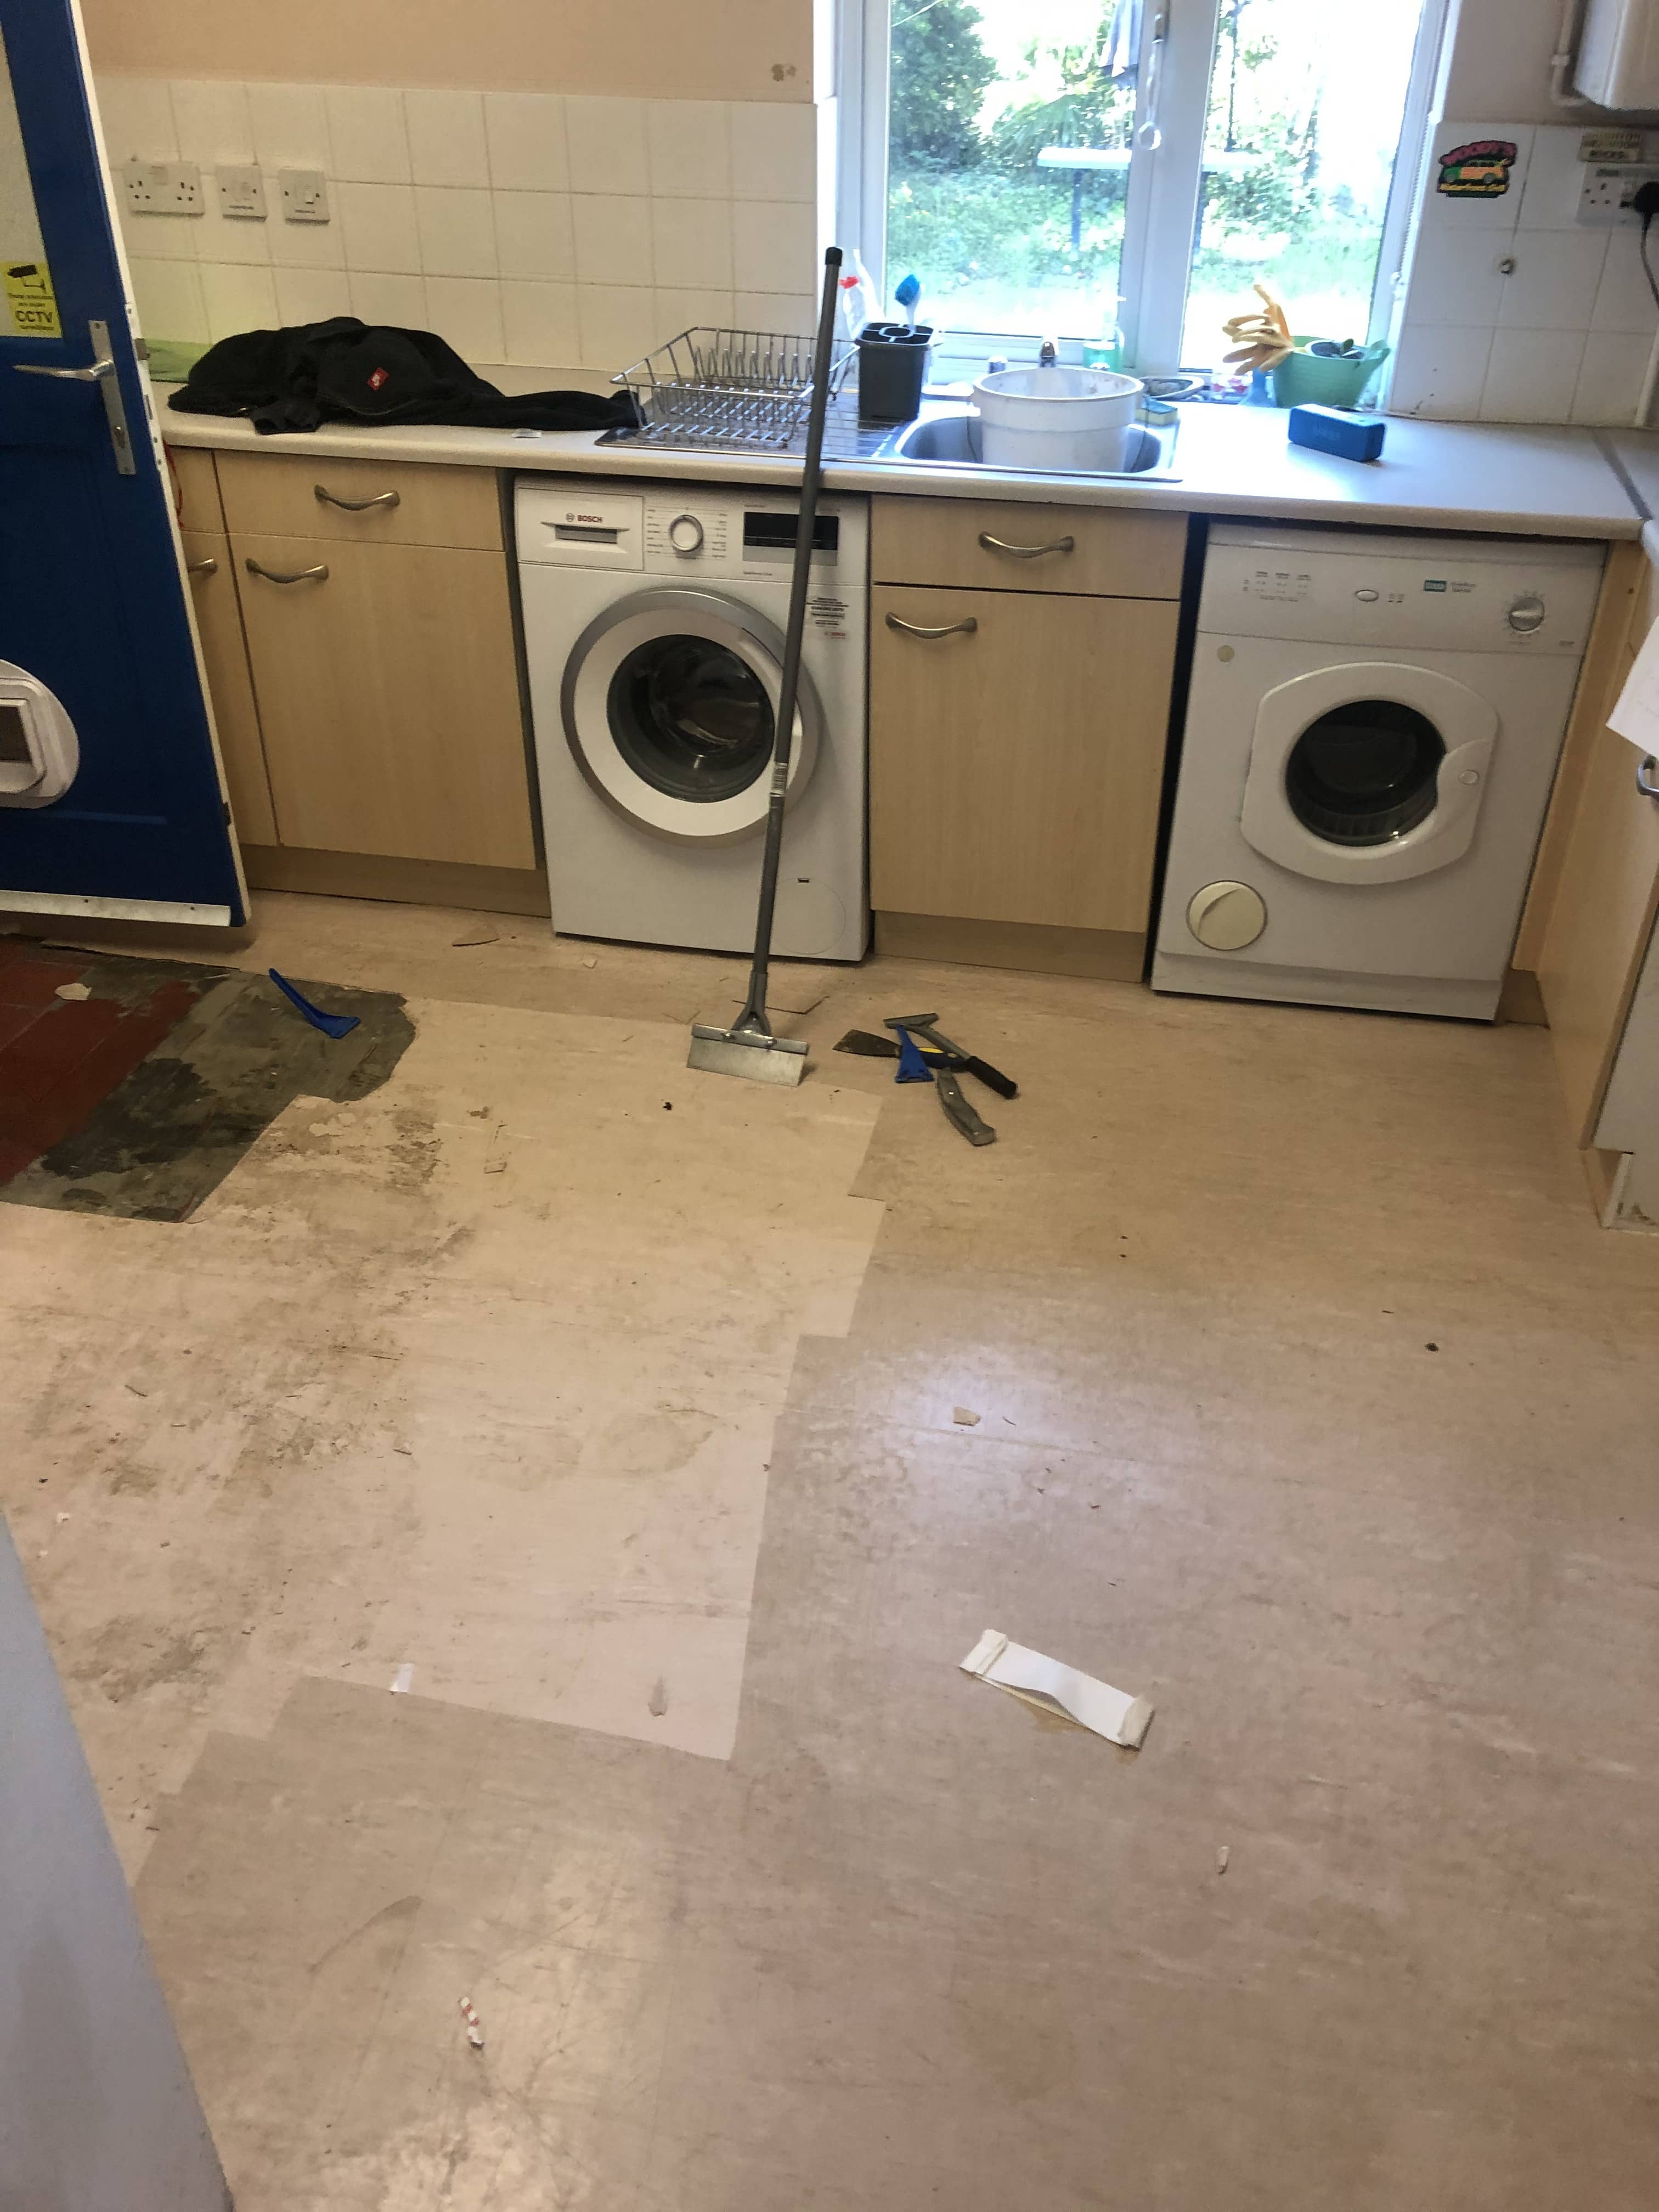
Lino Covered Quarry Tiled Floor During Restoration Ruislip Lino Covered Quarry Tiled Floor During Restoration Ruislip

On inspection the lino was well stuck to the tiles, it was clear it would take some time to lift and we wouldn’t know what to fully expect beneath until we started work. Non the less I gave her a quote for the work which she was happy to go ahead with and a date was booked in the diary.

Cleaning a Lino Covered Quarry Tiled Kitchen Floor

We started by removing the lino using various methods such as scraping, cutting, and pulling always mindful not to cause any damage to the tiles underneath. Unfortunately, the lino had been secured in place with strong adhesive so once we had removed the lino we were left with a thick layer of glue and a thin concrete screed that had been used to level the floor.

Lino Covered Quarry Tiled Floor During Restoration Ruislip

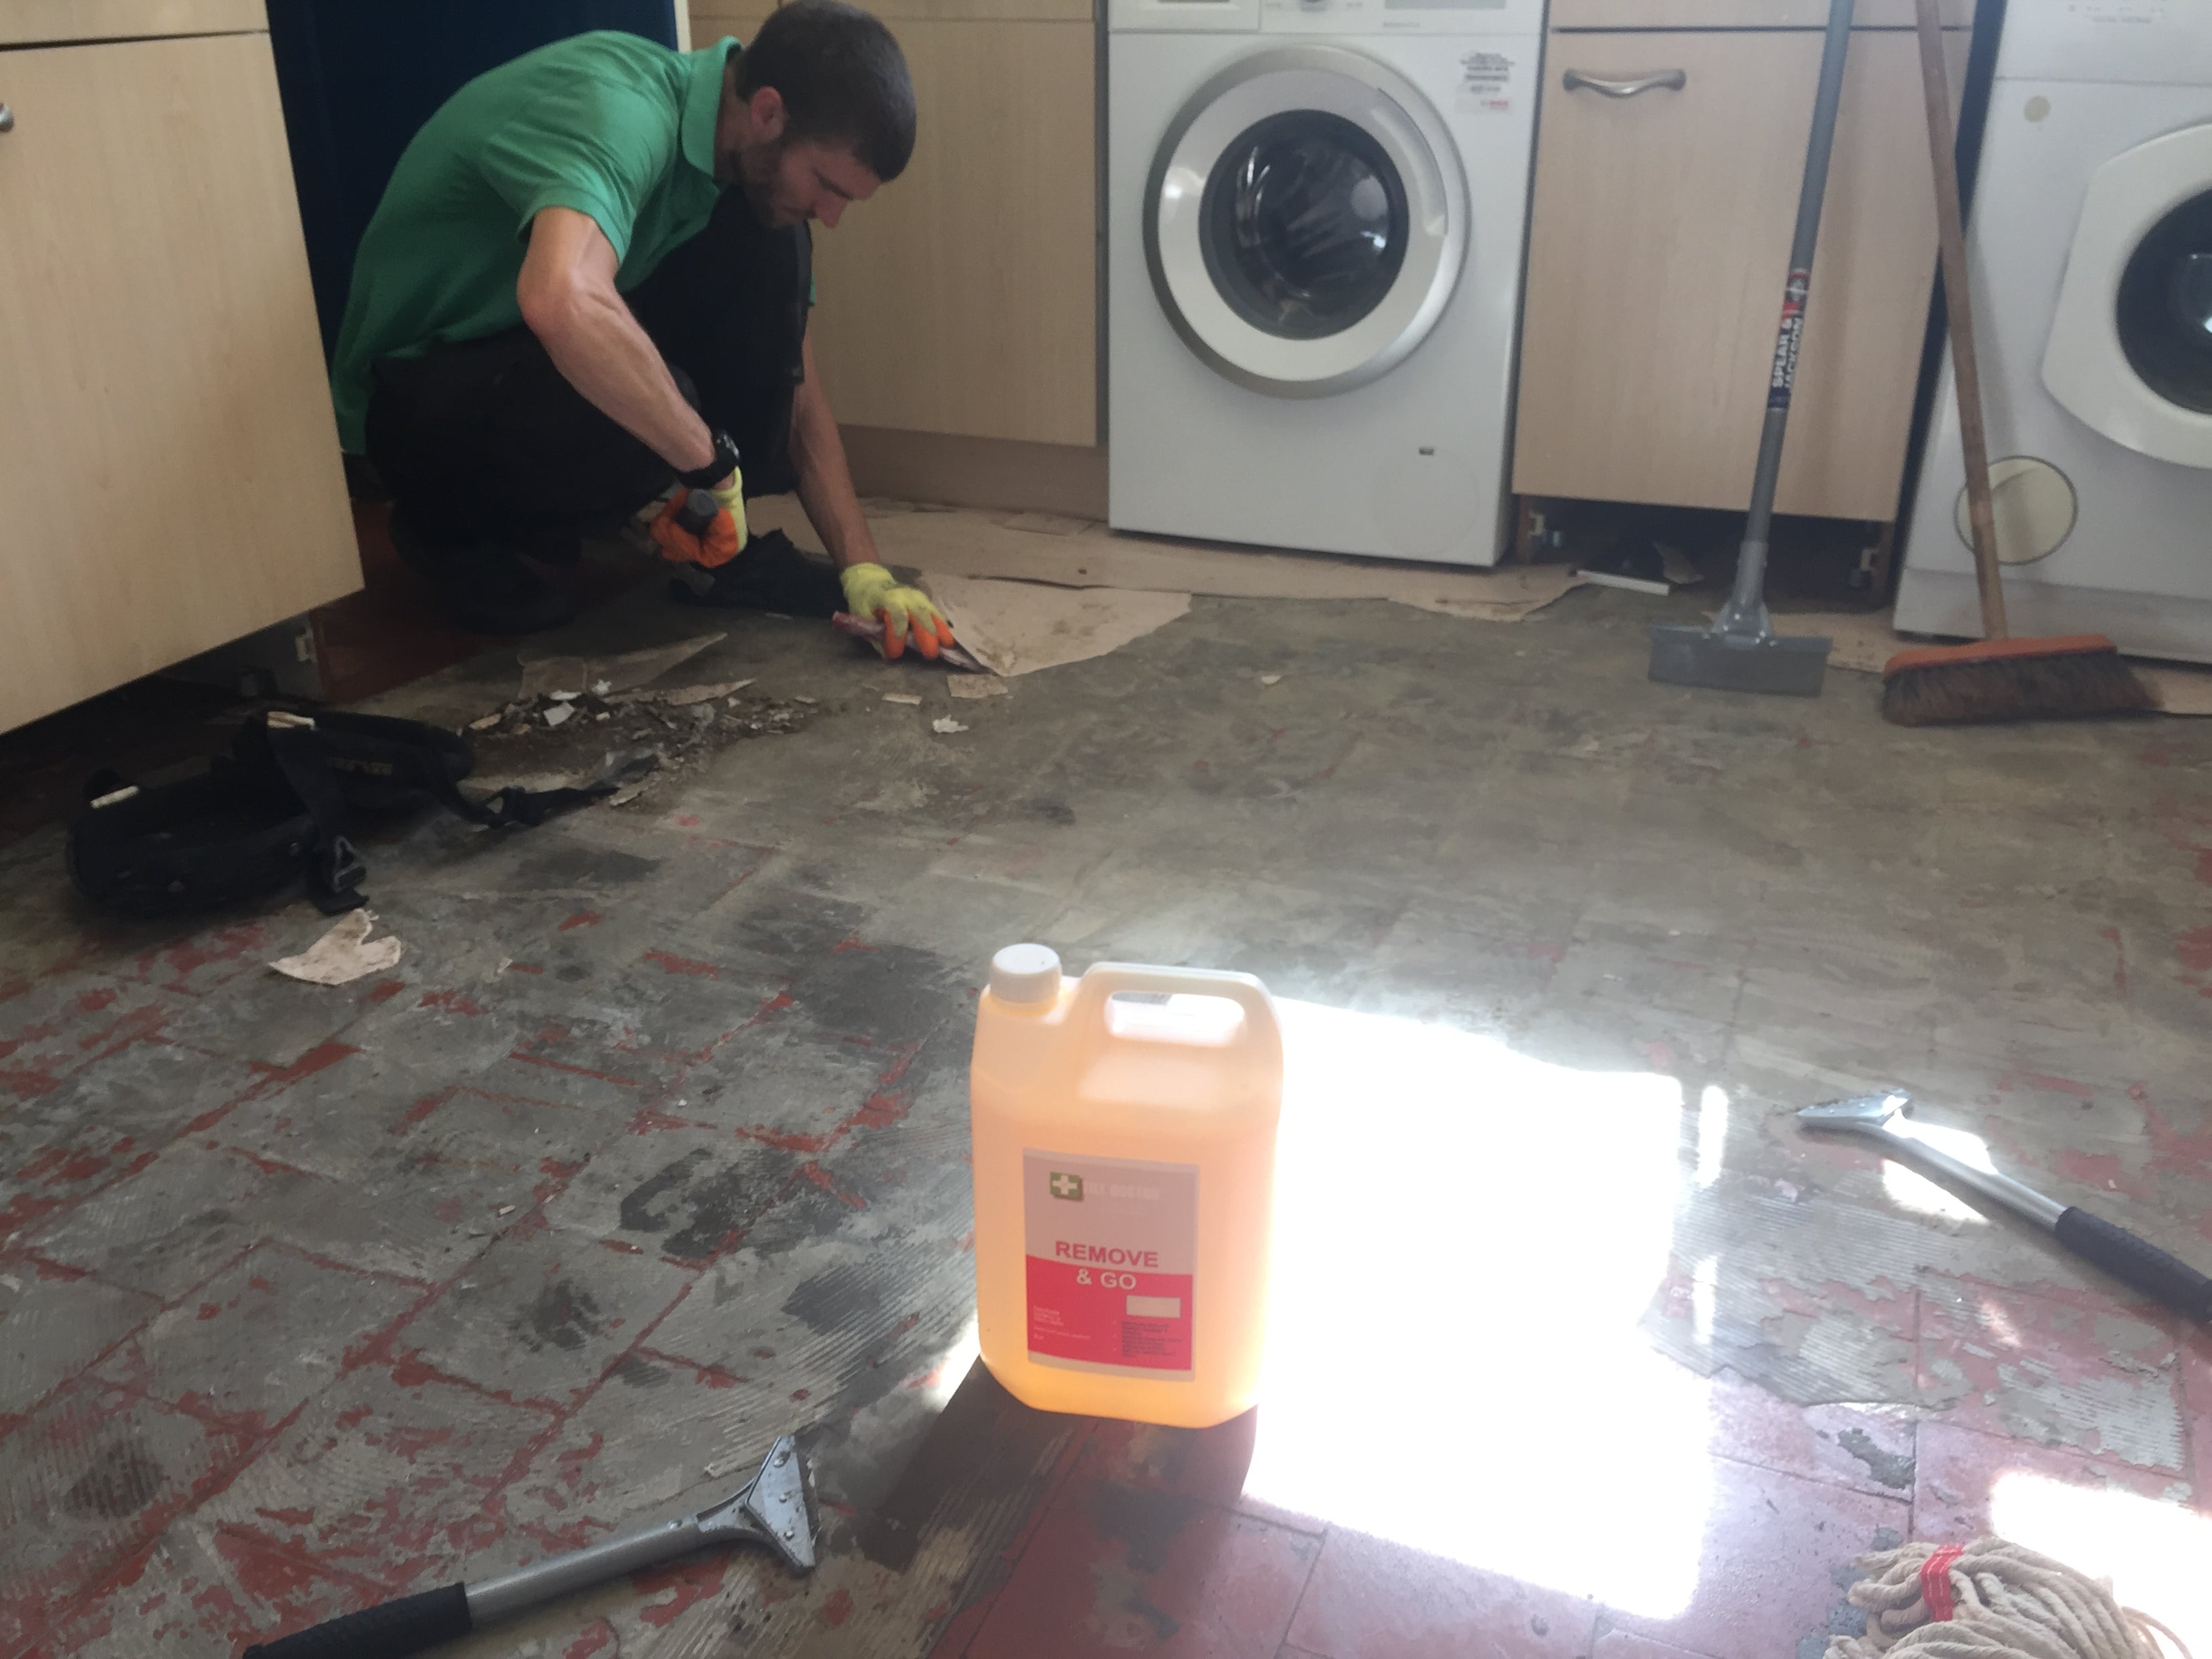
To deal with this the floor was soaked in a strong dilution of Tile Doctor Remove and Go which was left to dwell for some time before being scrubbed in. We find doing this gives the product time to soften the compounds making it easier to remove. Hands scrapers were employed to scrape off the glue and again care was taken not to damage the tile. The process had to be repeated to get the glue off but overall, it did a good job dealing with the glue and cement.

Once the Quarry tiles had been exposed however it was clear more work was needed to clean them up. The main problem was cement residue, so I used a combination of Tile Doctor Acid Gel, steam and a needle gun to remove the rest of the screed from the floor.

Lino Covered Quarry Tiled Floor During Restoration Ruislip Lino Covered Quarry Tiled Floor During Restoration Ruislip

The floor really did need a lot of work to restore it!

Once all of the cement was removed the floor was given a thorough rinse with water, the soil was then extracted with a wet vacuum and once I was satisfied it was as clean as it could be the floor was left to dry out overnight.

Sealing a Quarry Tiled Kitchen Floor

On the second day the floor was first checked for moisture using a damp meter, its not a good idea to add sealer to damp tiles as it will effect the result. I was satisfied the floor was dry and began the process of applying a couple of coats of Tile Doctor Colour Grow tile sealer. This is a colour intensifying sealer that will protect the Quarry tiles by soaking into the pores and occupying the space thereby preventing contaminates becoming ingrained in the tile. Additionally, Colour Grow is a fully breathable sealer which is an important consideration when sealing old floor like these which need to breath. Being covered in Vinyl for many years many also have trapped moisture under the floor.

Lino Covered Quarry Tiled Floor After Restoration Ruislip

The newly revealed quarry tiled floor responded amazingly well to the restoration and once the sealer had drier the Quarry tiles had a nice sheen appearance without looking too shiny. It was a lot of work but well worth the effort and my customer was delighted. For aftercare I recommended cleaning the floor with Tile Doctor Neutral Tile Cleaner, this is pH balanced and will ensure the newly applied seal lasts and is not compromised.

Lino Covered Quarry Tiled Floor After Restoration Ruislip


Professional Restoration of a Quarry Tiled Floor in South-Buckinghamshire

Quarry Tiled Floor Hidden Under Lino Restored in Ruislip Read More »

Ceramic Tiled Floor Before and After Renovation Uxbridge

Removal of Linseed Oil from a Ceramic Tiled Floor in Uxbridge

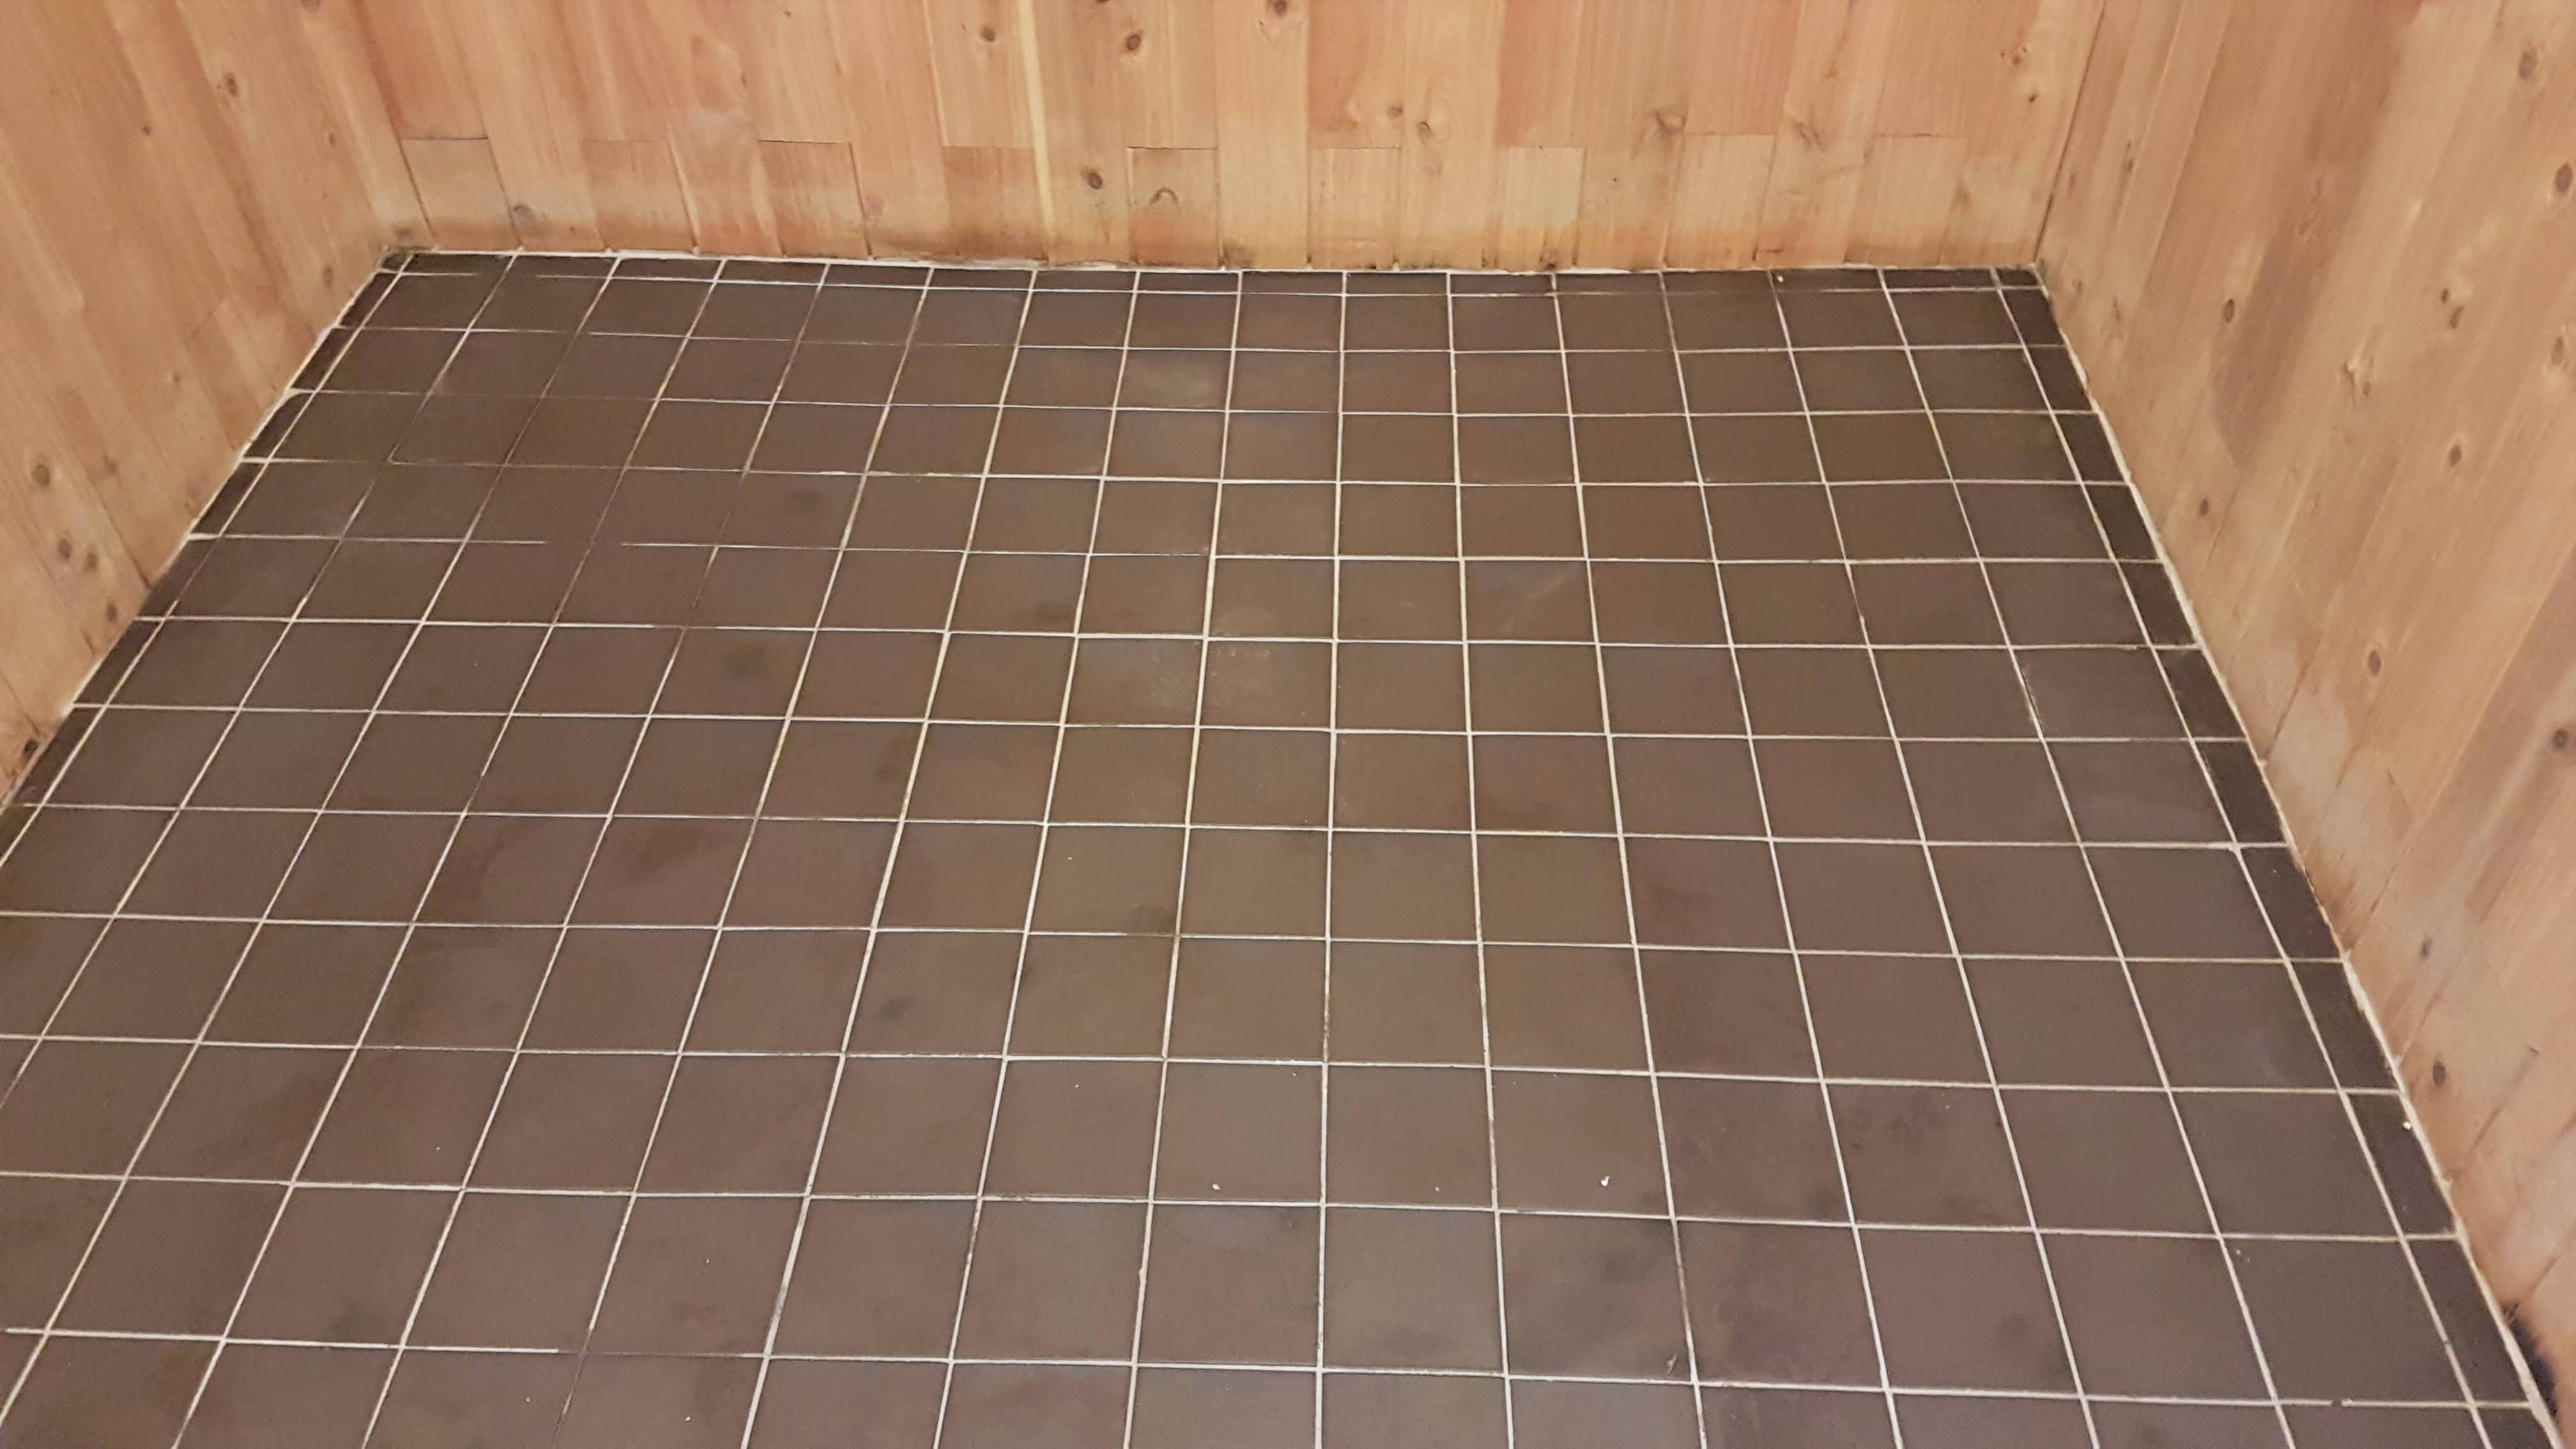
This is a small Ceramic tiled floor that a client had laid in his workshop next to his house in Uxbridge. As you can see from the photo the floor was in an indescribable mess and I was asked to pop round and quote for sorting it out. Uxbridge is actually classed as Middlesex but being close to the M25 and M40 I find it easy to reach.

Ceramic Tiled Workshop Floor Before Cleaning Uxbridge

As requested, I called in to survey the floor which was not a pretty site. In turns out that the tiler had applied boiled linseed oil to the floor (which the tiles did not need), and this had formed a horrible sticky residue on the surface. The client had conducted several unsuccessful attempts at cleaning up the floor and was unsure it could be rectified. Once of the attempts involved using acid which failed to remove the oil and unfortunately did do some damage to the grout causing it to discolour.

Undeterred, I was confident we could sort the problems out and restore the appearance of the tile and grout. I discussed with the client what we could do to clean the floor and we agreed a price to carry out the work out.

Cleaning a Ceramic Tiled Workshop Floor


Returning the following week, I first tackled the floor using Tile Doctor Pro-Clean applied neat, left to soak for ten minutes and then scrubbed in with a rotary floor buffer fitted with a black scrubbing pad. Pro-Clean is a highly concentrated multi-purpose tile cleaner, which when left to dwell, breaks down all types of dirt from oils through to grease and grime. It’s particularly good for very heavily soiled areas and it did a good job at removing the Linseed Oil. I rinsed the soiled solution with water and extracted the now soiled cleaning solution off the floor with wet vacuum. Wet vacuums are a great resource for Tile Doctor work, they make light work of removing liquids and this keeps the mess to a minimum.

I followed up the cleaning with a light buff of the tiles using Tile Doctor Grout Clean-up to remove the grout smears also left behind by the tiler. Cleaning the excess grout off the tiles made a huge difference to the floor, which you can see in the completed picture.

Ceramic Tiled Workshop Floor After Cleaning Uxbridge

Ceramic tiles have a glazed surface that won’t accept a sealer or Linseed Oil for that matter. There is therefore no need to apply any sealer or coating to this type of tile. They are generally very hardwearing and a suitable choice for a workshop like this. Hopefully, now the sticky oil has been removed the client will find the floor much more durable and easier to maintain.

The treatment worked well and I was able to complete the project in one day. The floor now looks like it should have done following the initial installation. Although it is only a small area, the difference is quite dramatic. My client was certainly pleased with the transformation and left the following feedback.

“Andrew is an expert in his field, and after an inexperienced tiler incorrectly used boiled linseed oil, Andrew worked to restore the tiles to their original beauty. I felt confident in him, he was a pleasure to work with, and his extremely professional. Very happy & highly recommended”


Professional Restoration of a Ceramic Tiled Workshop in Middlesex

Removal of Linseed Oil from a Ceramic Tiled Floor in Uxbridge Read More »

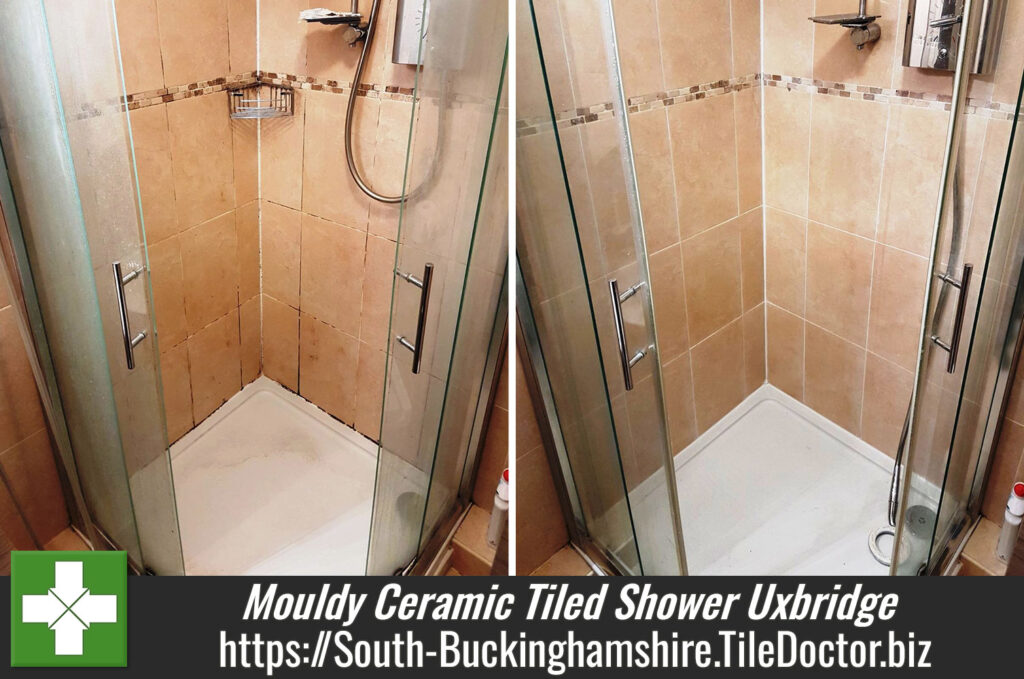
Mouldy Ceramic Tiled Shower Renovated in Uxbridge

Mouldy Ceramic Tiled Shower Renovated in Uxbridge

Ceramic and most Porcelain tiles are very easy to clean which makes them a good choice for shower cubicles, the one problem you will find though is that due to the cementitious nature of grout the top layer does attract dirt as can silicone. As a result, we recommend rinsing down showers with Tile Doctor Oxy-Pro on a regular basis or the problem will build. Mould can also be a problem especially if your bathroom is quite small or has inadequate ventilation to extract the hot steam in which mould thrives.

Ceramic Tiled Shower Cubicle Before Cleaning Uxbridge
This Ceramic tiled shower cubicle at a house in Uxbridge had all these problems and would need something much stronger to deal with the mould and remove the limescale which had also built up. Limescale from hard water is a problem that affects 60% of the UK with the South and East of England is particularly impacted due to the local chalk and limestone geology the water is filtered through. Buckinghamshire is known to have hard to very hard water and these tiny mineral deposits build up slowly on the surfaces of shower cubicles during use.

Deep Cleaning a Ceramic Tiled Shower Cubicle

To get the shower cubicle clean I began by spaying the tile and grout down with Tile Doctor Duo Clean which is a dual action product that is designed to clean grout and remove mould. You leave the product on the tiles for ten minutes and then scrub it in with a stiff brush, it’s hard work and you need to repeat in the stubborn areas, but it gets good results.

The tile and grout were then rinsed down with water and left to dry whilst I popped out for lunch. On my return I dried off any damp areas with a heat gun and took a step back to review the work I had done.

The results were good but unfortunately there were still a few dark stains in the grout which I was unlikely to be able to remove. When this happens, I find the best solution to achieve a consistent appearance is to apply a grout colourant to the grout. Tile Doctor grout colourants come in ten colours are relatively straight forward to apply, I always keep some of the popular colours in stock and on this occasion, I felt a White colourant would work best.

Normally the first stage would be to prepare the grout first with a pre-treater but given the grout had already been scrubbed hard I was able to move onto applying the colourant with a small brush. Grout Colourants not only recolour and rejuvenate the grout lines but also adds a barrier over the grout sealing it in and protecting it from further staining.

Whilst waiting for the colourant to dry I stripped out the mouldy sealant strip between the tile and shower tray and replaced with mould resistant silicone.

Ceramic Tiled Shower Cubicle Before Cleaning Uxbridge
The shower cubicle now looks much fresher and I’m sure will be a pleasure to take a shower in.

Professional Renovation of a Ceramic Tiled Shower Cubicle in Buckinghamshire

Mouldy Ceramic Tiled Shower Renovated in Uxbridge Read More »

Night Club WC Tile Cleaning After

Cleaning Ceramic Wall and Floor Tiled Toilets in a London Night Club

Our client’s project was to refurbish four toilets in a London Night Club but didn’t want the expense of replacing all the existing ceramic floor and wall tiles; after come across our web site we were invited to visit the club and provide a demonstration after which we were awarded the contract. Our main task on this project was to deep clean the ceramic wall tiles and floors and colour seal grout lines which had over the years had stained to a yellow appearance.

Night Club WC FloorTile Cleaning Before Night Club WC FloorTile Cleaning Before

Night Club Toilet Cleaning Day One

We started by giving all the tiles a though deep clean with Tile Doctor Pro-Clean which is a strong alkaline cleaner that is able to penetrate into the tile and lift the years of built up soiling on the tile and grout lines. This was followed with a further treatment of on the wall tile grout lines using Tile doctor Grout Clean up and another deep clean with Pro-Clean and pressure cleaned using our powerful truck mounted system which cleans under heat and high pressure and returns all the slurry to our recovery tanks for disposal.

Night Club WC Tile Cleaning After Night Club WC FloorTile Cleaning Before

Night Club Toilet Cleaning Day Two and Three

The tiles looked fantastic and like new again with the exception of the grout lines which although being deep cleaned of twenty years of dirt and grease still had a yellow appearance. The solution was to use a Grout Colourant to colour all the grout lines white again, the product we use is brilliant as not only does it give the appearance of newly applied grout is also protects the grout with a waterproof and stain proof barrier that is very easy to clean. Once dried we removed all the excess grout colourant residue from the tile and then polished the tiles to a pleasing high shine.

Night Club Urinal Wall Tile Cleaning Night Club WC Tile Cleaning After

The client was totally satisfied and impressed with our work which cost a fraction of what it could of cost to replace all the wall tiles. In fact a member of the management team was adamant that we had replaced the tile and grout as he thought it impossible we could of managed this good as new look any other way.


Commercial Tile Cleaning at a London Night Club

Cleaning Ceramic Wall and Floor Tiled Toilets in a London Night Club Read More »

Mosaic Tiled Floor and Basalt Tiles Before and After

Basalt and Glass Mosaic tiles in a wet room London N6

This property in London N6 had been rented out previously by the owners and they were now renovating it before moving back in, this work included a wet room which had glass mosaic floor tiles and a dark Basalt tile laid on the wall. The main problem had been a general lack of maintenance over the years which led to a major unsightly build-up of lime scale throughout the wet room. We agreed to do the work but had to explain to the client how difficult the work would be and set their expectation for only an eighty percent improvement. I must apologise in advance for the quality of some of the photographs on this page, the size of the room, low lighting a nature of the stone surfaces didn’t lend themselves well to being photographed.

Mosaic Tiled Floor and Basalt Tiles Before Mosaic Tiled Floor and Basalt Tiles Before

Day 1 -Cleaning Basalt and Mosaic Tiles

Having protected all the chrome furnishings within the wet room we started to soak the Basalt tiled walls with Tile Doctor Grout Clean-Up followed by scrubbing and rinsing constantly with clear water. Grout Clean-up is an Acid based product so you do need to take care when doing this however it is particularly effective at shifting mineral deposits like Limescale. When we were satisfied this had removed the majority of soap scum and lime scale we proceeded to clean the Glass Mosaic floor tiles using the same method.

Day 2 -Polishing Basalt wall Tiles

The basalt tiled walls now needed to be restored back to their original factory condition using small diamond encrusted burnishing pads attached to a hand held polishing machine. We started with a coarse pad which removed any remaining Limescale which had impregnated the surface of the stone and moved onto the finer pads which polish the stone. Once this was complete the tiles were given a final clean with Tile Doctor Neutral Cleaner which is an everyday cleaning product designed for regular use on stone or sealed tiled surfaces.

Day 3 -Sealing Basalt wall Tiles

We came back on the third day and after making sure the Basalt tiles had dried we gave it a final buffing to restore the stone to a deep high gloss shine. The last step was to seal the Basalt tile in order to protect it and make it easier to clean in the future and for this we applied three coats of Tile Doctor Colour Grow which is an impregnating sealer that soaks into the pores of the stone.

Finally we used a rotary floor polisher fitted with a white buffing pad to buff the mosaic glass floor to a high shine.

Mosaic Tiled Floor and Basalt Tiles After Mosaic Tiled Floor and Basalt Tiles After


Tiled wet room cleaned and polished in North London

Basalt and Glass Mosaic tiles in a wet room London N6 Read More »

Marble Floor Cleaned in Ealing

Marble Tiled Floor Cleaned and Polished in Ealing

These photographs were taken at a house in Ealing, West London where the customer had requested a deep clean and polish of the marble tiled floors installed in a kitchen and conservatory which had become dull and dirty over a period of time.

Marble Floor Cleaning in Ealing

Marble Tiled Floor Polishing

The first step was to give the Marble floor a thorough clean throughout with a medium dilution of Tile Doctor Pro-Clean which is an industrial strength Tile Cleaner safe to use on natural stone floors, we also took this opportunity to use a stiff brush along the grout lines to get them nice and clean, the soiled cleaning solution was removed using a wet vacuum and the floor rinsed with clean water.

The next step was to use a set of diamond encrusted Twister Burnishing Pads fitted to a rotary buffing machine to polish the floor. The pads come in a set of four; you start with the Red pad together with plain water and this cuts through and removes surface grime and any surface seal. You then progress through one by one until you get to the final Green polishing pad which provides a high polish, we managed to complete most of this process before the end of day.

Marble Floor Cleaning in Ealing

Polishing and Sealing Marble Tile

The next day we completed the polishing process with the Green pad which really brought a deep shine to the floor. To protect the floor it was then sealed using Tile Doctor Colour Grow sealer which provides a natural finish whilst enhancing the natural colours in the tile. We waited for the sealer to dry before buffing it with a white buffing pad to bring up the shine further.

Marble Floor Cleaned in Ealing
 

Marble tiled floor cleaned and polished in Ealing

Marble Tiled Floor Cleaned and Polished in Ealing Read More »

Terracotta Tile in Denham Before and After

Terracotta Tiled Floor Maintained in Denham, Buckinghamshire

This terracotta floor installed in a house in Denham, at the southern end of Buckinghamshire, had become discoloured with ingrained soil and a mix of old sealers and wax coating leaving an unsightly looking kitchen floor that was in need of stripping, deep cleaning and reseal.

Terracotta Tile in Denham Cleaning

Cleaning Terracotta Tile

I started the job using a solution of Tile Doctor Pro-Clean, which is a heavy duty alkaline product ideal for cleaning natural products such as Terracotta; this was scrubbed into the tiles quite aggressively with a black pad fitted to a rotary machine on slow speed. Once this had been completed we could see the remaining old sealers and wax layers and started to remove them using a strong tile stripper called Tile Doctor Remove and Go. Once we were satisfied we had removed all of the coatings we gave the floor a thorough rinse with clear water to remove any remaining residue and left it to dry overnight.

Terracotta Tile in Denham Cleaning

Sealing Terracotta Tile

The next day came back to do the sealing and checked the floor first for any spots we might had missed and also to ensure it had dried sufficiently. Tile Doctor Seal and Go was used to seal the floor, it’s a water based sealer so it doesn’t give off an odour when it’s drying and also offers durable stain protection together with a satin finish. Terracotta is very porous and in the end the floor actually took nine coats of sealer before it was fully sealed. Applying a sealer does takes a long time to apply as you have to wait for it to dry before applying the next coat.

Terracotta Tile in Denham After
The work took two days in all and you can see the difference for yourself, the floor is much cleaner and will be a lot easier to maintain going forward.

Terracotta Floor Cleaned and Sealed in Buckinghamshire

Terracotta Tiled Floor Maintained in Denham, Buckinghamshire Read More »

=================================

South Buckinghamshire Tile Doctor

================================= Read More »

Scroll to Top