tiled floor

Limestone Tiled Kitchen Floor After Cleaning and Sealing in Marlow

Deep Cleaning and Polishing a Limestone tiled kitchen floor in Marlow

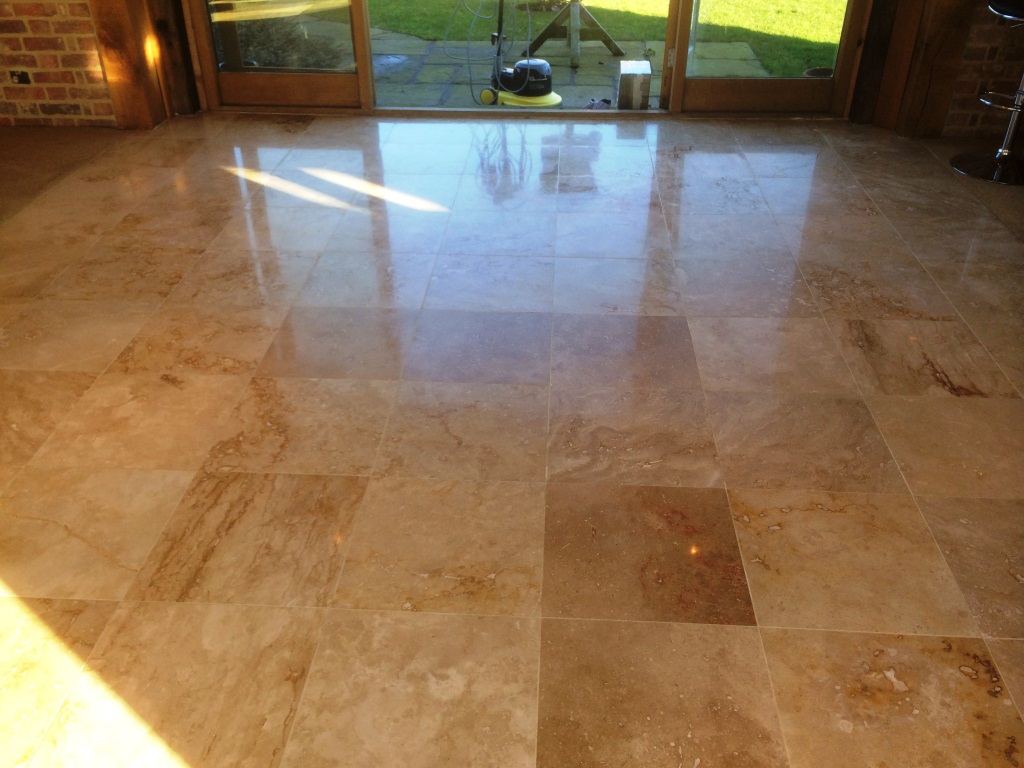
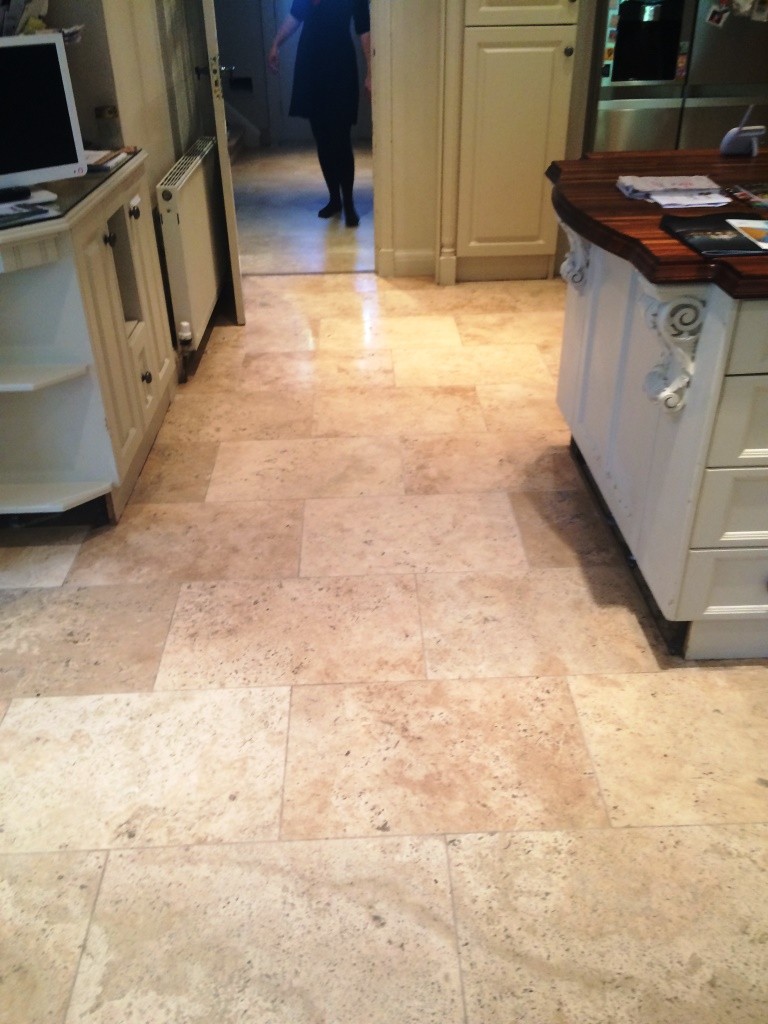
We were asked by the new owners of this property in Marlow to clean and seal the Limestone tiled kitchen floor which was in a heavily soiled condition and it was apparent that the tiles and the grout lines hadn’t been professionally cleaned for some time.

Limestone Tiled Kitchen Floor Before Cleaning in Marlow Limestone Tiled Kitchen Floor Before Cleaning in Marlow

Cleaning a Limestone Tiled Floor

To lift the ingrained soiling and restore the grout we started by applying a dilution of Tile Doctor Pro-Clean which was hand scrubbed into the grout lines with a stiff grout brush, this was followed up with Tile Doctor Grout Clean-Up which returned the grout lines to the original colour. The resultant soiled solutions were then removed from the floor with the aid of fresh water and an industrial wet vacuum.

Polishing Limestone Tiles

Our next task was to re-hone the stones using the Tile Doctor Diamond encrusted burnishing pad system which cleans and polishes natural stone returning it to its original condition. The pads come in a set of four and you start with the coarse pad together with a little water. This this cuts through and removes surface grime, dirt and any remaining sealer. The floor is then rinsed and you move on through the remaining pads until the polish has been restored to the tiles. This process took up much of the first day so the floor was given a final rinse and left to dry overnight.

Sealing Limestone Tiles

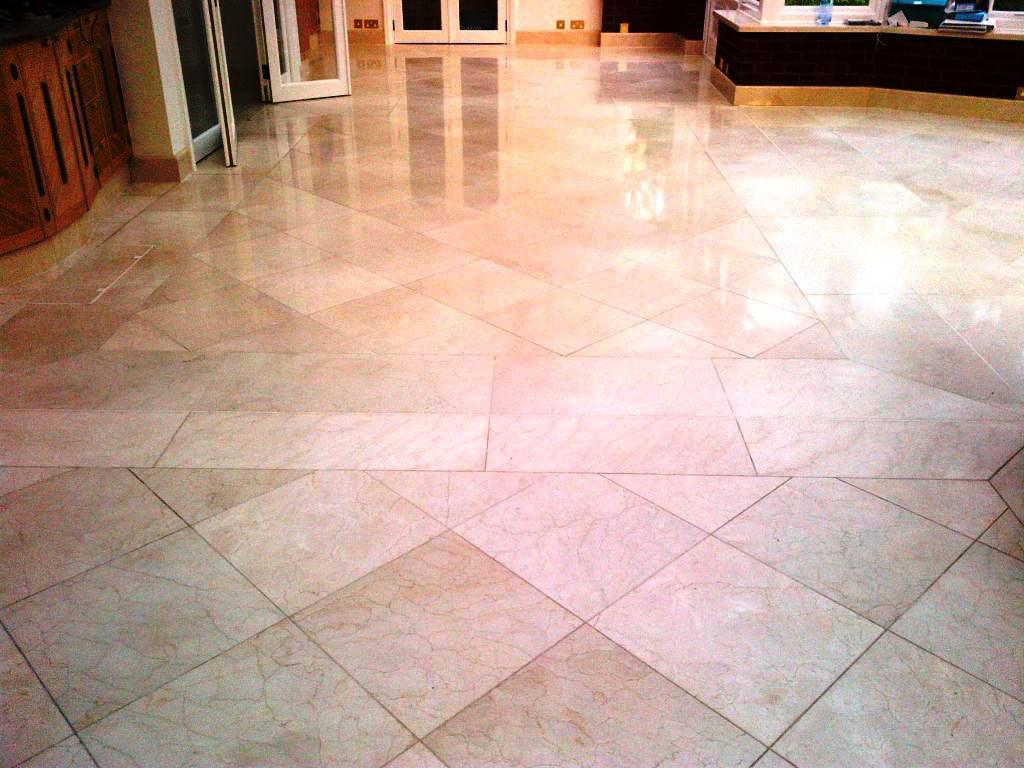
On the second day we returned to find the tiles had dried and as expected and we started to seal the tile which we did with two coats of Tile Doctor Colour Grow which is a colour intensifying sealer that soaks into the pores of the stone bringing out the natural colours whilst providing that all important lasting protection.

Limestone Tiled Kitchen Floor After Cleaning and Sealing in Marlow Limestone Tiled Kitchen Floor After Cleaning and Sealing in Marlow

The customer was amazed with the clean appearance of her tiled floors and said it had transformed her house ready to live in.

Limestone Tile Cleaning and Polishing in Marlow, Buckinghamshire

Deep Cleaning and Polishing a Limestone tiled kitchen floor in Marlow Read More »

Travertine Tile in Aston Clinton After

Cleaning and Polishing a Travertine Tiled Floor in Ashton Clinton

These Travertine tiles were laid five years ago at a residential property in Ashton Clinton and our client had never been entirely happy with the tillers finish from sealing which was marked with smears and also had the tillers bare footed prints embedded within the seal. The sealer was now wearing off and polish fading so it was due to be re-done and we were given the call.

Cleaning Travertine Tile in Aston Clinton During

Burnishing a Travertine Tiled Floor

The owner had maintained the floor well so we set to work removing the old sealer using rotary machine fitted with a coarse number One diamond encrusted burnishing pad and a little water. The resultant slurry was rinsed off and removed using a powerful wet vacuum the grout lines were given a good scrub by hand using a stiff brush and Tile Doctor Grout clean–up. With the same method we cleaned and polished the tiles with the number Two and Three burnishing pads followed by a final clean and rinse and then left to dry overnight.

Polishing Travertine Tile in Aston Clinton During

Sealing and Polishing Travertine Tile

The next day the tiles had completely dried we used the final number Four burnishing pad which is a very fine pad to polish and add shine to the travertine floor. The last stage was to seal the Travertine which we did with two coats of Tile Doctor Colour Grow which is a colour intensifying sealer that brings out the colours in natural stone and provide lasting protection.

Travertine Tile in Aston Clinton After
 

Travertine Tile Cleaning and Polishing in Ashton Clinton, Buckinghamshire

Cleaning and Polishing a Travertine Tiled Floor in Ashton Clinton Read More »

Aylesbury Office Porcelain Floor Cleaning After

Cleaning White Porcelain Tiles at Premises in Aylesbury

This commercial unit in Aylesbury had white porcelain tiles laid in the restroom and reception areas several years prior and had been assured they would be easy to clean, however over the years they had deteriorated leaving an unsightly grey staining throughout and were now in need of a thorough deep clean.

Aylesbury Office Porcelain Floor Cleaning Aylesbury Office Porcelain Floor Cleaning

Cleaning White Porcelain Tiles

A mixture of Tile Doctor Pro-Clean combined with NanoTech UltraClean impregnating cleaner products was spread evenly across the tiles and worked into the floor using a rotary scrubbing machine set on slow speed. We proceeded to work the floor in this manner to lift the soling followed by black stripping pads on a 150rpm rotary machine. When we were satisfied that the ingrained dirt had been lifted from the porcelain tile we used our van mounted pressure cleaning system to wash the dirt from the floor, this system has been a great investment for us and uses heat and high pressure to clean and remove the slurry back to recovery tanks in the van.

Aylesbury Office Porcelain Floor Cleaning

We let the floor dry and returned the second day to scrub along the stained grout lines and return them to their original colour using a strong mix of Tile Doctor Grout clean-up and with this solution rescrubbed the areas using our rotary machines and with a complete final clean and rinse buffed the tiles to a high shine.

Aylesbury Office Porcelain Floor Cleaning After


Porcelain Tile Cleaning in Aylesbury

Cleaning White Porcelain Tiles at Premises in Aylesbury Read More »

Cleaning Micro porous textured porcelain in beaconsfield

Cleaning Micro-Porous textured Porcelain Tiles in a Beaconsfield Kitchen Diner

Our customer in Beaconsfield had been having great difficulty cleaning a textured Porcelain tiled floor that was installed in the kitchen and adjacent dining room; despite numerous attempts whatever she tried never have the desired effect. During the home survey we demonstrated on a single tile how using our cleaning agents we could remove the soiling and restore the original colour of the tile which hadn’t been seen for a number of years.

Micro porous textured porcelain in beaconsfield before cleaning Micro porous textured porcelain in beaconsfield Before Cleaning

Scrubbing Micro-Porous Textured Porcelain Tiles

Equal amounts of Tile Doctor Pro-Clean combined with Tile Doctor NanoTech UltraClean was spread evenly throughout the floor and worked in with a rotary machine fitted with a scrubbing pad running at slow speed. The tiny abrasive particles in the cleaning solution worked deep into the tile to bring out the dirt so once the whole floor was treated in this manner we switched to the next machine.

Cleaning Micro porous textured porcelain in beaconsfield Cleaning Micro porous textured porcelain in beaconsfield

The next machine we used was a truck mounted device that directs hot water onto the tile at high pressure using a second hose to remove the soiled solution back to a storage tank in the van. It’s a very effective machine that has an instant effect on the tile.

Cleaning Micro porous textured porcelain in beaconsfield
Once this process was completed we scrubbed out the grout lines using a mix of Tile Doctor Grout Clean-Up which did a good job of cleaning the grout and also removed any soiling left from our previous clean. Once this was done we gave the floor a final clean and rinse and then left to dry overnight.

Sealing Micro-Porous Textured Porcelain tiles

Most porcelain tiles like ceramics won’t take a sealer however Micro-Porous Porcelain tiles do need sealing due to their porosity so we came back the 2nd day to apply two coats of Tile Doctor Seal And Go which will protect the tile from staining and aid the future maintenance. I should mention that we recommended the use of Tile Doctor Neutral tile cleaner for regular maintenance; its neutral PH formula is ideal for sealed floors as domestic acidic cleaners will eat away at the sealer over time and reduce its life.

Micro porous textured porcelain in beaconsfield after cleaning
 

Porcelain Tile Cleaning in Beaconsfield

Cleaning Micro-Porous textured Porcelain Tiles in a Beaconsfield Kitchen Diner Read More »

Night Club WC Tile Cleaning After

Cleaning Ceramic Wall and Floor Tiled Toilets in a London Night Club

Our client’s project was to refurbish four toilets in a London Night Club but didn’t want the expense of replacing all the existing ceramic floor and wall tiles; after come across our web site we were invited to visit the club and provide a demonstration after which we were awarded the contract. Our main task on this project was to deep clean the ceramic wall tiles and floors and colour seal grout lines which had over the years had stained to a yellow appearance.

Night Club WC FloorTile Cleaning Before Night Club WC FloorTile Cleaning Before

Night Club Toilet Cleaning Day One

We started by giving all the tiles a though deep clean with Tile Doctor Pro-Clean which is a strong alkaline cleaner that is able to penetrate into the tile and lift the years of built up soiling on the tile and grout lines. This was followed with a further treatment of on the wall tile grout lines using Tile doctor Grout Clean up and another deep clean with Pro-Clean and pressure cleaned using our powerful truck mounted system which cleans under heat and high pressure and returns all the slurry to our recovery tanks for disposal.

Night Club WC Tile Cleaning After Night Club WC FloorTile Cleaning Before

Night Club Toilet Cleaning Day Two and Three

The tiles looked fantastic and like new again with the exception of the grout lines which although being deep cleaned of twenty years of dirt and grease still had a yellow appearance. The solution was to use a Grout Colourant to colour all the grout lines white again, the product we use is brilliant as not only does it give the appearance of newly applied grout is also protects the grout with a waterproof and stain proof barrier that is very easy to clean. Once dried we removed all the excess grout colourant residue from the tile and then polished the tiles to a pleasing high shine.

Night Club Urinal Wall Tile Cleaning Night Club WC Tile Cleaning After

The client was totally satisfied and impressed with our work which cost a fraction of what it could of cost to replace all the wall tiles. In fact a member of the management team was adamant that we had replaced the tile and grout as he thought it impossible we could of managed this good as new look any other way.


Commercial Tile Cleaning at a London Night Club

Cleaning Ceramic Wall and Floor Tiled Toilets in a London Night Club Read More »

Slate Tiled Floor in Tring Bucks Before and After

Riven Slate Tiled Kitchen floor cleaned and sealed in Tring Bucks

These Riven Slate tiles at house in Tring Buckinghamshire had been laid five years earlier and the original sealant had worn off especially around the high traffic cooker and fridge areas. This has led to dirt getting trapped into the pores of the tile and the whole floor becoming rather dull.

Slate Tiled Floor in Tring Bucks Before

Cleaning Riven Slate Floor Tiles

We started with a strong dilution of Tile Doctor Pro-Clean which is an alkaline tile cleaner designed for use on tile, stone and grout. It was scrubbed into the tile and grout lines to give the floor a deep clean and then rinsed with clean water. To strip the remaining sealant we used Tile Doctor Remove and Go spread throughout the floor and then left for 45 minutes to soften the sealant, then with the use of an aggressive black pad fitted to a rotary machine the remaining sealant was stripped from the tile. The last step was to rinse the floor with clean water to remove any cleaning products and neutralise it before sealing, it was then left overnight to dry.

Sealing Riven Slate Tiles

The next day we came back to seal the floor, the customer had previously requested a matt finish for the floor so Tile Doctor Colour Grow was chosen as the sealer, this product provides the desired matt finish but also lifts the natural colours in the stone as well as providing the necessary stain protection going forward.

Slate Tiled Floor in Tring Bucks After
 

Cleaning and Sealing a Slate Tiled Floor in a London shop

Riven Slate Tiled Kitchen floor cleaned and sealed in Tring Bucks Read More »

Ceramic Tile Wendover After

Deep Cleaning Textured Ceramic kitchen floor tiles Wendover Bucks

We were asked to clean these textured ceramic floor tiles in Wendover Bucks which had become heavily soiled and ingrained with dirt leaving the tiles with a black appearance, the grout lines had also become stained and discoloured. Our customer had tried all types of cleaning agents but could never get the desired effect.

Ceramic Tile Wendover Washing Ceramic Tile Wendover Washing

Cleaning a Textured Ceramic Tiled Floor

A dilution of Tile Doctor Pro-Clean alkaline tile cleaner was applied throughout the tiled floor and worked in with the aid of a scrubbing pad fitted to a rotary machine, a stiff hand brush was also used along the grout lines and this managed to lift most of the soiling from the floor.

Next step was to use our powerful truck mounted heated turbo system which jet washed the remaining particles out of the crevasses of the stone. This system uses high pressure heated water though a spinner tool, it’s an amazing tool that returns the dirty water directly back to a recovery tank leaving the floor chemical free and neutralised.

Before leaving I recommended to the customer that regular use of Tile Doctor Neutral Tile cleaner would help to keep their tile and grout in better condition.

Ceramic Tile Wendover After Ceramic Tile Wendover After


Deep Cleaning Ceramic Tiles in Buckingham

Deep Cleaning Textured Ceramic kitchen floor tiles Wendover Bucks Read More »

Mosaic Tiled Floor and Basalt Tiles Before and After

Basalt and Glass Mosaic tiles in a wet room London N6

This property in London N6 had been rented out previously by the owners and they were now renovating it before moving back in, this work included a wet room which had glass mosaic floor tiles and a dark Basalt tile laid on the wall. The main problem had been a general lack of maintenance over the years which led to a major unsightly build-up of lime scale throughout the wet room. We agreed to do the work but had to explain to the client how difficult the work would be and set their expectation for only an eighty percent improvement. I must apologise in advance for the quality of some of the photographs on this page, the size of the room, low lighting a nature of the stone surfaces didn’t lend themselves well to being photographed.

Mosaic Tiled Floor and Basalt Tiles Before Mosaic Tiled Floor and Basalt Tiles Before

Day 1 -Cleaning Basalt and Mosaic Tiles

Having protected all the chrome furnishings within the wet room we started to soak the Basalt tiled walls with Tile Doctor Grout Clean-Up followed by scrubbing and rinsing constantly with clear water. Grout Clean-up is an Acid based product so you do need to take care when doing this however it is particularly effective at shifting mineral deposits like Limescale. When we were satisfied this had removed the majority of soap scum and lime scale we proceeded to clean the Glass Mosaic floor tiles using the same method.

Day 2 -Polishing Basalt wall Tiles

The basalt tiled walls now needed to be restored back to their original factory condition using small diamond encrusted burnishing pads attached to a hand held polishing machine. We started with a coarse pad which removed any remaining Limescale which had impregnated the surface of the stone and moved onto the finer pads which polish the stone. Once this was complete the tiles were given a final clean with Tile Doctor Neutral Cleaner which is an everyday cleaning product designed for regular use on stone or sealed tiled surfaces.

Day 3 -Sealing Basalt wall Tiles

We came back on the third day and after making sure the Basalt tiles had dried we gave it a final buffing to restore the stone to a deep high gloss shine. The last step was to seal the Basalt tile in order to protect it and make it easier to clean in the future and for this we applied three coats of Tile Doctor Colour Grow which is an impregnating sealer that soaks into the pores of the stone.

Finally we used a rotary floor polisher fitted with a white buffing pad to buff the mosaic glass floor to a high shine.

Mosaic Tiled Floor and Basalt Tiles After Mosaic Tiled Floor and Basalt Tiles After


Tiled wet room cleaned and polished in North London

Basalt and Glass Mosaic tiles in a wet room London N6 Read More »

Marble Floor Cleaned in Ealing

Marble Tiled Floor Cleaned and Polished in Ealing

These photographs were taken at a house in Ealing, West London where the customer had requested a deep clean and polish of the marble tiled floors installed in a kitchen and conservatory which had become dull and dirty over a period of time.

Marble Floor Cleaning in Ealing

Marble Tiled Floor Polishing

The first step was to give the Marble floor a thorough clean throughout with a medium dilution of Tile Doctor Pro-Clean which is an industrial strength Tile Cleaner safe to use on natural stone floors, we also took this opportunity to use a stiff brush along the grout lines to get them nice and clean, the soiled cleaning solution was removed using a wet vacuum and the floor rinsed with clean water.

The next step was to use a set of diamond encrusted Twister Burnishing Pads fitted to a rotary buffing machine to polish the floor. The pads come in a set of four; you start with the Red pad together with plain water and this cuts through and removes surface grime and any surface seal. You then progress through one by one until you get to the final Green polishing pad which provides a high polish, we managed to complete most of this process before the end of day.

Marble Floor Cleaning in Ealing

Polishing and Sealing Marble Tile

The next day we completed the polishing process with the Green pad which really brought a deep shine to the floor. To protect the floor it was then sealed using Tile Doctor Colour Grow sealer which provides a natural finish whilst enhancing the natural colours in the tile. We waited for the sealer to dry before buffing it with a white buffing pad to bring up the shine further.

Marble Floor Cleaned in Ealing
 

Marble tiled floor cleaned and polished in Ealing

Marble Tiled Floor Cleaned and Polished in Ealing Read More »

Terracotta Tile in Denham Before and After

Terracotta Tiled Floor Maintained in Denham, Buckinghamshire

This terracotta floor installed in a house in Denham, at the southern end of Buckinghamshire, had become discoloured with ingrained soil and a mix of old sealers and wax coating leaving an unsightly looking kitchen floor that was in need of stripping, deep cleaning and reseal.

Terracotta Tile in Denham Cleaning

Cleaning Terracotta Tile

I started the job using a solution of Tile Doctor Pro-Clean, which is a heavy duty alkaline product ideal for cleaning natural products such as Terracotta; this was scrubbed into the tiles quite aggressively with a black pad fitted to a rotary machine on slow speed. Once this had been completed we could see the remaining old sealers and wax layers and started to remove them using a strong tile stripper called Tile Doctor Remove and Go. Once we were satisfied we had removed all of the coatings we gave the floor a thorough rinse with clear water to remove any remaining residue and left it to dry overnight.

Terracotta Tile in Denham Cleaning

Sealing Terracotta Tile

The next day came back to do the sealing and checked the floor first for any spots we might had missed and also to ensure it had dried sufficiently. Tile Doctor Seal and Go was used to seal the floor, it’s a water based sealer so it doesn’t give off an odour when it’s drying and also offers durable stain protection together with a satin finish. Terracotta is very porous and in the end the floor actually took nine coats of sealer before it was fully sealed. Applying a sealer does takes a long time to apply as you have to wait for it to dry before applying the next coat.

Terracotta Tile in Denham After
The work took two days in all and you can see the difference for yourself, the floor is much cleaner and will be a lot easier to maintain going forward.

Terracotta Floor Cleaned and Sealed in Buckinghamshire

Terracotta Tiled Floor Maintained in Denham, Buckinghamshire Read More »

Limestone Floor Before and After Cleaning

Cleaning and Polishing a Limestone tiled floor in High Wycombe

The photographs on the page come from the kitchen and dining area of a house in High Wycombe which had previously been rented out to tenants and the client wanted required the Limestone Tiled floor tiles to be cleaned and polished before the next occupant moved in.

Limestone Floor Before Cleaning Limestone Floor Before Cleaning

Cleaning a Limestone Tiled Floor

We started the project with a deep clean of the tiles and grout using a dilution of Tile Doctor Pro-Clean which is a heavy duty alkaline cleaning product specially designed for use on natural stone floors. This was left to dwell for a while and then agitated using a rotary machine fitted with a Black Scrubbing pad. The soiled solution was then removed using a wet vacuum and the floor was then rinsed down with fresh clean water; the process was repeated until a satisfactory result was obtained and we also treated the discoloured grout lines with more Pro-Clean and a stiff brush.

Limestone Tiled Floor Polishing

We used a set of diamond encrusted Burnishing Pads fitted to a rotary buffing machine to polish the Limestone floor. These pads are ideal for restoring the shine on hard stone surfaces such as Limestone and Marble, the come in a set of four and you start with the Red pad together with plain water and this cuts through and removes surface grime and any surface seal. The floor was then washed down again, this time with Tile Doctor Neutral cleaner which is an everyday cleaning product and then left to dry overnight.

Sealing Limestone Tiles

On the second day we gave the Limestone a polish using a Green burnishing pad which is a very fine pad that provides a high polish. The last step was to seal the Limestone which we did with two coats of Tile Doctor Colour Grow which is a colour intensifying sealer that brings out the colours in natural stone and provide lasting protection.

Limestone Floor After Cleaning
 

Limestone Tile Cleaning and Polishing in High Wycombe, Buckinghamshire

Cleaning and Polishing a Limestone tiled floor in High Wycombe Read More »

Textured Marble floor in Chesham After

Polishing a Textured Marble Tiled floor in Chesham

A customer recently purchased a property the village of Chesham and hoped we could improve the appearance of her textured marble tiled floors which had over a number of years become dull and lost the polished marble look one would expect from a floor of this quality.

Marble Tile Cleaning and Polishing

For polished stone like Marble and Limestone the only way to restore the finish is to burnish the floor and this floor was no different. The burnishing pads are diamond encrusted and come in a setup of four seventeen inch pads for use with a heavy rotary machine, each pad having a different purpose.

So we started with the Red pad which is designed to remove sealers together with a little water, we then took the opportunity to clean up the grout by applying a dilution of Tile Doctor Pro-Clean and scrubbing it into the grout lines to get them clean. Next step was to remove the soiled cleaning solution and wash the floor down with water before moving onto the white burnishing pad which will grind off ingrained dirt and is the first step in polishing the floor. We then completed the floor polishing using the Yellow then Green polishing pads which smooth down the surface and produce a shiny finish.

Textured Marble floor in Chesham Before

Sealing Textured Marble Tiles

Once the floor was polished we applied Tile Doctor Shine Crystallising Powder to the marble tile using a rotary machine fitted with a white polishing pad. This last step gives a very deep high shine as well as a tough durable finish.

Textured Marble floor in Chesham After
When the customer returned she asked was it safe to walk on as the floor as at first glance it looked wet; we assured her this is the Tile Doctor high shine appearance and is perfectly ok.

Textured Marble Floor Tiles Cleaned and Polished in Buckinghamshire

Polishing a Textured Marble Tiled floor in Chesham Read More »

Ceramic Tile and Grout Before and After

Grout colour seal and Ceramic tile clean in Chalfont St Giles

We were asked to improve the appearance of this Ceramic tiled floor and Grout installed in a kitchen in Chalfont St Giles which over a few years had become difficult to keep clean and the grout lines had become stained and discoloured.

Ceramic Tile and Grout Before Ceramic Tile and Grout Before

Cleaning Tile and Grout

Our first task on day one was to clean the Ceramic tiles and Grout so we created a diluted 50/50 mixture of tile doctor Pro-Clean and Nanotech UltraClean, the two products combine to provide a very powerful tile friendly alkaline cleaner with tiny sized abrasive particles. This was left to soak into the tile and grout before being agitated and scrubbed with a scrubbing machine running on low speed. We also used stiff grout hand brushes along the grout lines. Once we were happy with the overall condition of the tile and grout it was washed down using clean water and the resultant soiled solution extracted from the floor using a wet vacuum. I’m pleased to say that using this method we were able to return the tile and grout back to its original colour.

Whilst this was a fantastic transformation the grout lines being porous would untreated soon become dirty and discoloured. The only answer to this problem is a permanent colour seal to the grout lines which not only aids the future floor cleaning, but improves the whole appearance of the floor.

Applying the Grout Colour

Before applying a Grout Colour it’s important to ensure the grout is clean of grease and dirt naturally we had just cleaned this floor so this was not a problem I only mention it in case you were considering taking on a similar task yourself.

Once the grout has dried you can start applying the colourant which is a relatively straightforward process of squeezing the product onto a toothbrush and running it onto the grout. Don’t be tempted to use an old toothbrush for this purpose as it may contaminate the colourant leading to discolouration in the finish.

We completed the project the next day using an Aqua Mix sand coloured Grout Colourant; the customer was extremely pleased and commented how whole clean and efficient the process was.

Ceramic Tile and Grout After Ceramic Tile and Grout After


Tile Cleaning and Grout Colouring in Buckinghamshire

Grout colour seal and Ceramic tile clean in Chalfont St Giles Read More »

Terracotta Tiles Before and After Sealing

Terracotta Kitchen Tiles Deep Cleaned in Great Missenden

This customers Terracotta tiled floor was installed in the kitchen of a house in Great Missenden and had become ingrained with dirt and soiling over the last twenty years leaving an unsightly black greasy appearance which was impacting the sale of the property.

Cleaning Terracotta Tiles

On the first day we covered the floor with a strong dilution of Tile Doctor Pro Clean which is a heavy duty Tile Stone and Grout Cleaner mixed 50/50 with Tile Doctor Ultra Clean which adds abrasive particles into the mix. The resulting combination provides a powerful cleaning agent that penetrated deep into the tile and in conjunction with a rotary machine fitted with a scrubbing pad managed to remove several layers of soiling. We then rinsed the floor with fresh water and removed the vast amount of slurry with a wet vacuum.

Terracotta Tiles During Cleaning
The next step of our cleaning process was to apply Tile Doctor Remove and Go across the tiles and let it soak in as before; Remove and Go is a coatings remover that will strip the floor of any seal or wax coatings which had been applied to the floor over the years, again the product was worked in using a scrubbing pad and then washed off.

Once we were happy with all cleaning and seal and wax removal and the floor had returned to its original condition we left the floor to dry.

Terracotta Tiles After Sealing

Sealing Terracotta Floor Tiles

Once the floor was dry we started to seal it in order to protect it and for this we chose Seal and Go which not only leaves a surface protection but also brings though the true colour of the stone returning the floor to its original beauty, Terracotta is very porous and it took seven coats before it was fully sealed.

Our customer was very happy with the difference and I have since been informed they have received a first offer on the property.


Terracotta tiles deep cleaned in Great Missenden, Buckinghamshire.

Terracotta Kitchen Tiles Deep Cleaned in Great Missenden Read More »

Scroll to Top